
1:48 Victorian roombox
Lately, I've found vintage roomboxes fascinating - the exterior treatments really set them apart from today's roomboxes. Typically they have a base with molded edge and some type of colummns framing the front opening. And the open top makes them easy to photograph.
I made this roombox as a temporary setting for favorite minis that I want to use somewhere special. Hopefully it will change contents over time, as I finish other projects.
A vintage-style roombox
I studied pics of several vintage roomboxes before building my own, and found that they had a lot in common. The base tends to be assembled in the same way, there's the columns or flat pilasters at the front, and a piece of stripwood glued flat to the top of the walls. All these things contribute to the character.
On the other hand, there were things I didn't like as well - the vintage roomboxes tend to have printed paper flooring, and there's rarely any skirting-board (baseboard). So I've combined a vintage-style exterior, with an interior that has all the detailing of a normal miniature room.
For the exterior, I used burnt umber artist oil paint diluted with artist quality turpentine. It took forever to dry, but I really like the finish and think it adds to the vintage feel. The skirting-boards and exterior walls are faux painted; first a coat of pale yellow, and then diluted burnt umber. The columns and scribed flooring are treated with Liberon stain and a couple of coats of Danish oil. Flocked wallpaper by J. Hermes.
Furnishings
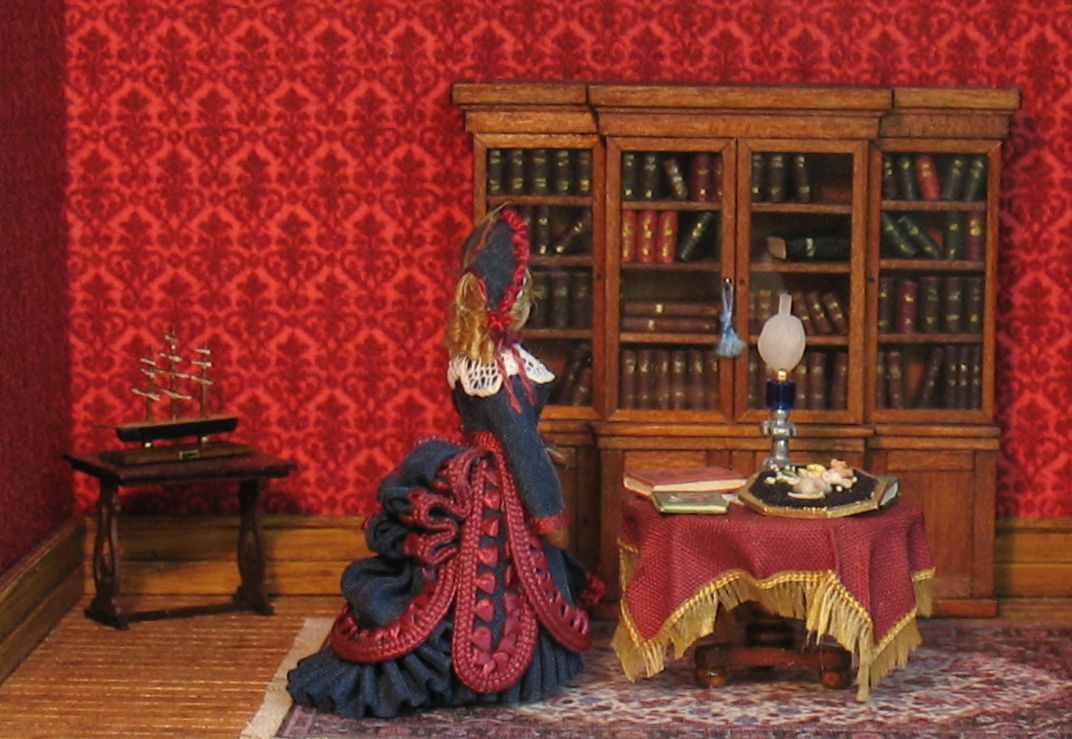
This bookcase is one of my favorite pieces. My directions for building it were printed in LEN volume 6, issue 2. I made the lady doll around the same time. The model ship in the corner is reduced from 1" scale instructions in Dollshouse World magazine (the ship in the magazine had its sails set, but I could only manage furled sails). It sits on a table made from Madelyn Cook's instructions in Nutshell News July 1990.
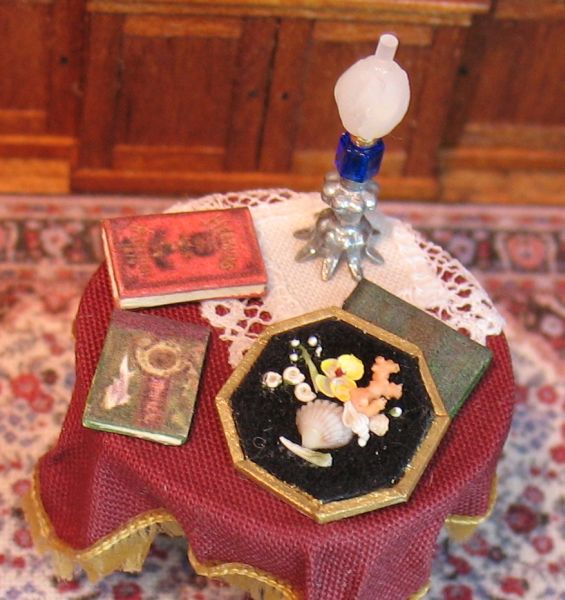
On the center table, I'm displaying a sailor's valentine by Pam Scott, made from tiny real shells and coral. The books are from a kit I got years ago - I don't know who made it. My how-to's for the table and kerosene lamp are found in the DIY section. The white doily under the kerosene lamp helps reflect the light from the lamp.
I bought the carpet online years ago (can't recall where from). It's printed on slightly fuzzy fabric. I added the fringe (strips of fabric unravelled along one edge, and glued to the back of the carpet).
The sofa is inspired by my grandmother's 1880s sofa. I made it back in 1998, my second year of 1:48 scale miniing. Let's just say it was a bad choice for a beginner's project, figuring it out from scratch without a pattern or anything... it did teach me to stay out of the Victorian era! I don't think I did a single Victorian item in the next five years.
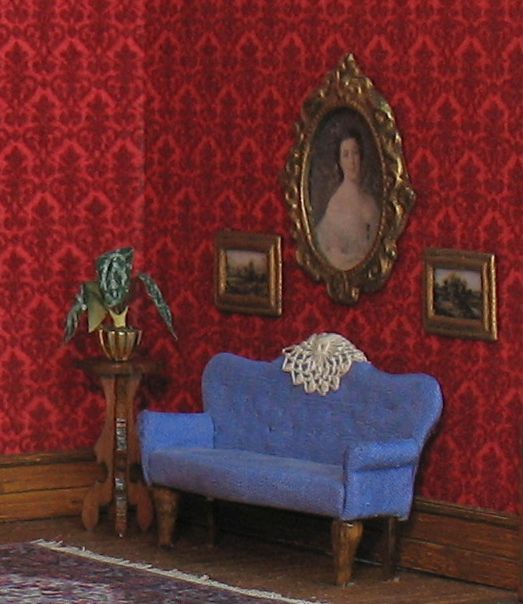
I bought the plant stand kit from Karen Benson Miniatures. The plant is an Anthurium Crystallinum, inspired by a pic in a book on houseplants (many mini plants just require paper, wire, scissors, glue and paint).
For the paintings above the sofa, I repainted an oval metal miniature frame and two doll-sized belt buckles, and printed out some paintings from the internet.
The left wall of the room is empty, as I ran out of furniture - after all, this is supposed to be a transit hall for finished minis, not another unfinished project...