
1:48 scale Victorian kerosene table lamps
Idea and instructions by Anna-Carin Betzén
Kerosene or paraffin lamps were invented in the 1850's. Mine are loosely based on several lamps I've seen online. Dating information is scarce - at best they've been described as Victorian. I think you could use variations on this style into the 1910s.
Based on catalog pics, it seems that from the 1920s and on, fashionable kerosene table lamps look pretty much like contemporary electric lamps. The lampshades are pleated, adorned with fringe, etc.
Supplies and tools
- 3 to 4 mm (1/8" to 5/32") beads, beadcaps and similar findings
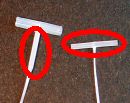
- 1 mm (1/32") clear rod, about 3 to 5 mm (1/8" to 3/16") per lamp - I used pieces from the ends of a transluscent price tag connector (on mine, the bits circled in red in the pic were the right size - yours might be different)
- Tiny beads for burner - I used gold plated 15/0 seed beads (approx. 1.5 mm or 1/16" across)
- Pins (the kind with a tiny steel head)
- Heavy-duty wire cutters
- Cyanoacrylate glue
- Tacky glue
- Paint
- Fimo
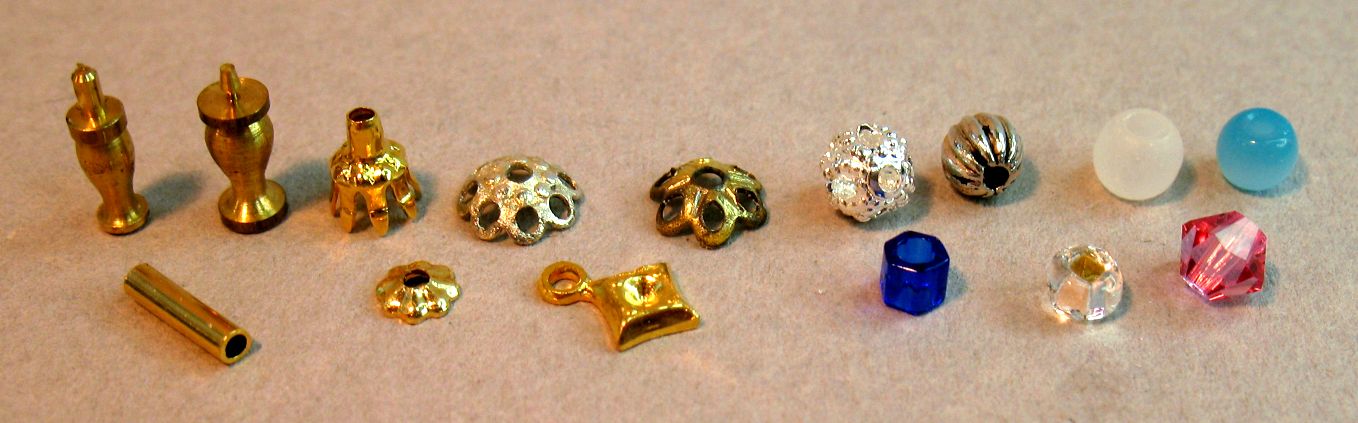
This pic shows some of the suitably sized beads, bead caps, and other findings I located in my stash. Most of them come from bead shops or dealers specializing in findings. I bought the turned brass columns in a model ship building store.
In selecting beads and findings for a lamp, I try to mimick the five major components that make up a real-life Victorian kerosene lamp:
- Base; often metal and always wide at the bottom for stability
- Fuel container; sometimes it's a part of the base but usually it's made of a different material, e.g. clear or colored glass - often a little smaller than the lampshade
- Brass colored lamp burner
- lampshade from frosted or milky glass
- Clear cylinder chimney
Kerosene table lamps
Generally, this is how I've assembled my lamps:
- Run a pin through the base piece/pieces (the pinhead should be at the bottom) and secure with cyanoacrylate glue
- Paint the base if desired
- Add a bead for the fuel container (unless it's a part of the base, as in lamp #1 below)
- Add a tiny gold bead for lamp burner, checking how it looks in combination with the lampshade
- Cut the pin so that it extends about halfway into the lampshade
- Glue on the lampshade with cyanoacrylate glue. My frosted beads have so large holes that the tiny gold bead (burner) wanted to disappear into the lampshade, so I added a couple of extra beads, gluing them to the pin, and then glued the lampshade to the extra beads (so they're inside the lampshade).
- Glue the chimney into the lampshade, again using cyanoacrylate glue.
Four lamps to get you started
In each pic, I've included the beads and findings I used to make the base of that lamp. All of the lampshades are described in the next section.
|
|
|

|
| Lamp 1 | Lamp 2 | Lamp 3 | Lamp 4 |
|---|---|---|---|
|
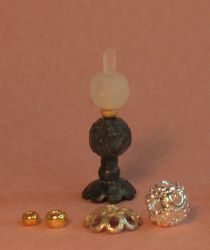
A cast iron lamp dating to the 1880s. I used two seed beads between the beadcap and the filigree bead; one 11/0 (2 mm or 5/64" across) and one 15/0 (1.5 mm or 1/16" across). I wanted a textured rather than pierced base, so I filled the holes with Tacky glue before painting it all grey. |
Bend the prongs of the base outwards using pliers. The bulge above it is two tiny beadcaps back to back, topped with a 15/0 bead. The fuel container is a hex cut 8/0 Delica bead. |
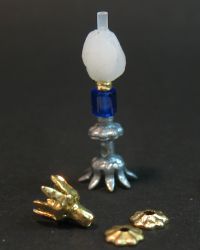
I couldn't run a pin through the base as the square finding had no center hole, so I snipped off the head of a pin and glued the pin inside the brass tube. Then I snipped off the eye of the pendant and glued it to the tube, and glued on four 15/0 beads for feet. This base didn't need painting as all parts already were the same color. The fuel container is a 4 mm Swarovski bicone bead. |
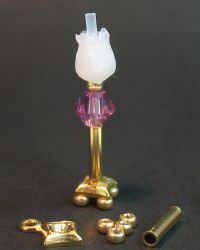
The turned column has a short, thick, pin at the top end, and it wouldn't fit into any of the beads I had. So I glued the column to the beadcap, filling the holes with Tacky glue and then painting it, and made a black "bead" from Fimo to fit on the column's pin. After baking the bead I painted on roses with the tip of a pin, and sealed it with a clear coat. Then I glued a 15/0 bead on top for the burner, glued the chimney inside the lampshade, and glued the lampshade to the burner (balancing it carefully so it would sit straight). |
Lampshades
For lamps number 1 and 4, I used 4 mm (5/32") frosted plastic beads that I happen to have. Clear plastic beads can be sanded for a similar effect. I tinted the pink lampshade myself - apply acrylic paint all over a frosted bead, then immediately wipe it all off (use medium to strong colors - it took a bright red to get this shade of pink).
The other two lampshades are made from transluscent Fimo. Form a basic shape from Fimo and insert a pin. On lamp number 2 I tried to indent vertical lines to make ridges, but it mostly just distorted the shape. The fluted top edge on number 3 turned out better - I grabbed a tiny bit of the opening around the pin using pointed tweezers and pulled out a little, repeat all around. After baking, you can drill the top half of the hole larger, to take the chimney.
Opaque glass or plastic beads would work for lampshades made of opal glass rather than frosted glass. White is the obvious choice, but I've also seen some photos of Victorian kerosene lamps that had opaque pink glass lampshades with painted gold decor.