1:48 scale candlesticks
Idea and instructions by Anna-Carin Betzén
I came up with this when I needed some candlesticks for the dressing table in my Gustavian house. Sculpting with glue is an idea I got from a miniature magazine article featuring Nell Corkin.
Some of my other candlestick variations are described near the bottom of this page.
Supplies and tools
- Steel sewing pins. For in-scale slim candles, silk pins are the best as they're the thinnest (0.5 mm diameter). Silk pins are superb for sewing too, in any fabric - not just silks.
- Circles (or other shapes) about 3 mm (1/8") across, cut or punched from card.
- Heavy-duty wire cutter
- Toothpicks or other tools for applying glue
- Reverse tweezers
- Post-it notes
- Aleene's Tacky Glue - other brands may or may not work; e.g., Sobo glue doesn't seem to work very well. You need a thick glue; one with a slight tendency to form strings works better than one that just makes wet blobs, if you see what I mean. (Glue from a bottle that has sat for a while tends to be a little thicker than in a brand new bottle).
- Cyanoacrylate glue
- A bit of styrofoam
- Fine point marker pen (optional)
- Paintbrush
- Paint for the candle and candlestick - preferably one of the brands sold for use on plastic modelling or wargaming, as they stick well to both metal and glue. There are both water-based and solvent-based brands. My favorite, Testors' Model Master enamel paint, is solvent-based. For a pewter look, mix about equal parts of silver and medium grey. Of course you can also paint it to look like e.g. porcelain, or whatever you like. You also need flat paint in white or cream (or your choice of color) for the candle.
Making the candlestick's "skeleton"
 Place the reverse tweezers on its side, resting on the table and with its tip over the card circle.
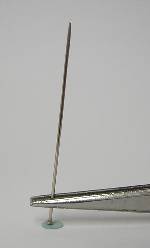 With the tweezers still on the table, squeeze to open so you can place the pin in the jaws.
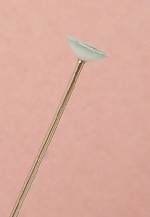
Adjust the pin heightwise, so its head touches the card circle.
 If it doesn't sit straight vertically, just poke it with your finger tip until it does. When done, it should
look like this.
If it doesn't sit straight vertically, just poke it with your finger tip until it does. When done, it should
look like this.
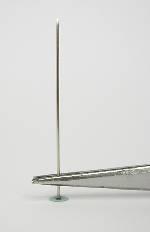
Carefully lift the tweezers away from the circle, with the pin still sitting nice and straight in it (don't sqeeze!).
Apply a little cyanoacrylate glue to the pinhead and put the tweezers down with the end of the pin centered on the circle. The tweezers, resting on the table, will hold the pin in position while
the glue dries.
When the glue has dried completely, squeeze the tweezers to free the pin. If you want two or more matching candlesticks, make the additional "skeletons" now before you proceed - if you work
assembly-line style, it'll be easier to make them look identical than if you make one at a time.
Sculping "turnings" with glue
 For the sculpting part, it's easiest if you hold the pin between your fingers so you can twirl it. Form a
symmetrical mound of glue on the base, then stick it in a styrofoam block and put aside too dry. If you're working assembly-line style, continue with the next candlestick. As you continue to work
on them, keep comparing them to each other to check that they look the same.
For the sculpting part, it's easiest if you hold the pin between your fingers so you can twirl it. Form a
symmetrical mound of glue on the base, then stick it in a styrofoam block and put aside too dry. If you're working assembly-line style, continue with the next candlestick. As you continue to work
on them, keep comparing them to each other to check that they look the same.
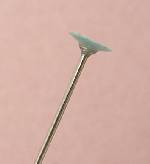 When the glue has dried, it'll have shrunk noticably (mine looked like this). Apply another layer of glue
like you did with the first. You might even need a third layer.
When the glue has dried, it'll have shrunk noticably (mine looked like this). Apply another layer of glue
like you did with the first. You might even need a third layer.
 When you like the look of the base and the glue has dried, you can add turnings to the stem above the base.
Again, hold the pin so you can twirl it. Load your toothpick or other tool with glue and keep in mind that you don't want apply it dot by dot, but rather try to get a tiny part of the glue blob to
cling to the stem, and then pull it away so it stretches thinner and you can apply a string of glue around the stem (one or more turns, as needed). It should look like a symmetrical white bead
stuck on the stem. It should preferably be a thick layer, but pretty narrow, if you see what I mean. If you mess it up, gently wipe the glue off and start again. Then set it aside to dry while you
work on the matching ones.
When you like the look of the base and the glue has dried, you can add turnings to the stem above the base.
Again, hold the pin so you can twirl it. Load your toothpick or other tool with glue and keep in mind that you don't want apply it dot by dot, but rather try to get a tiny part of the glue blob to
cling to the stem, and then pull it away so it stretches thinner and you can apply a string of glue around the stem (one or more turns, as needed). It should look like a symmetrical white bead
stuck on the stem. It should preferably be a thick layer, but pretty narrow, if you see what I mean. If you mess it up, gently wipe the glue off and start again. Then set it aside to dry while you
work on the matching ones.
 I added a second glue bump too while I was at it.
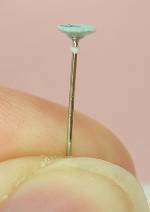
 With a little luck your candlesticks have a nice well-defined shape when the glue has dried, if not you can
apply more glue on the turnings or where else needed. You could also go on to create raised ornaments on the base, or other features you come up with, with glue.
With a little luck your candlesticks have a nice well-defined shape when the glue has dried, if not you can
apply more glue on the turnings or where else needed. You could also go on to create raised ornaments on the base, or other features you come up with, with glue.
Painting the candlestick
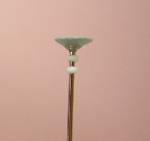
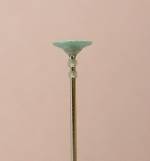
 Holding on to the pin, paint the candlestick, letting the paint extend as far up the stem as you like. Again,
twirling does the trick. I paint mine a little bit beyond the topmost bump. Set aside to let the paint dry.
Holding on to the pin, paint the candlestick, letting the paint extend as far up the stem as you like. Again,
twirling does the trick. I paint mine a little bit beyond the topmost bump. Set aside to let the paint dry.
Cutting the candle
Decide how tall you want the candle to be. The candles can be any height, but for household use a brand new candle probably shouldn't measure more than 6 mm (1/4") above the actual candlestick. If you're making matching candlesticks, mark the height on the pins and compare so you know they're all the same height.
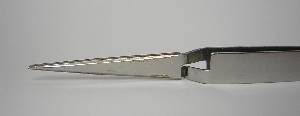
You're about to cut the pin, but do read these warnings first. Be careful!!! The pin will break with a snap and jump away, and you don't want it in your eyes!
To minimise the risk that anything goes wrong, I position the wire cutter for the cut, hold it over my worktable, cup my other hand over it, close my eyes and squeeze the cutter. If you can, grip the pin's pointed end with the cupping hand, so it can't jump (you still need to cup the hand, so you don't lose the most interesting part - your candlestick!).
It's important to use a proper heavy-duty wire cutter, not a fine precision tool, otherwise you'll spoil the cutter (in the best case, the jaws just get jagged; worst case is that part of the cutter's jaws snap off from the excessive tension and jump off in some unexpected direction - it happened to me once).
Taking the precautions described above, cut the pin at your chosen height. Dispose of the pointed part of the pin in some safe manner. If you marked the candle height with a pen, rub off the marks.
Painting the candle
 Stick the candlesticks on the sticky part of a post-it note for this final step.
 Paint the candles white or cream. I start at the base of the candle and make a brush stroke going straight
upwards, then turn the candlestick around and make a similar stroke from the back. If the line around the base of the candle is very uneven, touch it up while the paint is wet.
Paint the candles white or cream. I start at the base of the candle and make a brush stroke going straight
upwards, then turn the candlestick around and make a similar stroke from the back. If the line around the base of the candle is very uneven, touch it up while the paint is wet.
When the paint has dried completely and you want want to place your new candlestick somewhere, it's easiest to lift it by the candle. As the candle is so sturdy, it's safe to push it down firmly but gently, if you want to stick it in place with e.g. tacky wax.
Candlestick variations
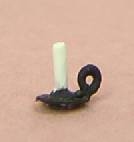 Chamber candleholders are low, have a handle, and the base has upturned edges. They don't require any
sculpting with glue at all (quicker, but makes them more vulnerable as there's no big glob of glue bonding the pin to the base). Use a tiny cupped sequin for the base instead of a punched shape.
Wrap thin wire around a pin to form a tiny handle, cut off and glue it to the sequin with cyanoacrylate glue. Paint as for the other candlesticks.
Chamber candleholders are low, have a handle, and the base has upturned edges. They don't require any
sculpting with glue at all (quicker, but makes them more vulnerable as there's no big glob of glue bonding the pin to the base). Use a tiny cupped sequin for the base instead of a punched shape.
Wrap thin wire around a pin to form a tiny handle, cut off and glue it to the sequin with cyanoacrylate glue. Paint as for the other candlesticks.
(This pic isn't any good example, really - it's one of the first candlesticks I made, and the wire I used for the handle is awfully thick.)
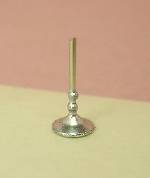
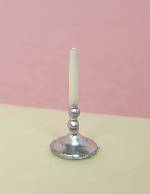
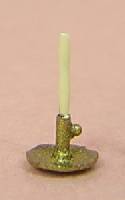 Some candleholders of this type have an adjusting knob so you can raise and lower the candle, and these
have a cylindrical stem.
Some candleholders of this type have an adjusting knob so you can raise and lower the candle, and these
have a cylindrical stem.
To thicken the stem (easiest done before applying the base), cut a 1.5 mm (1/16") strip of tissue paper, spread a thin layer of Tacky glue on it and wrap it one or
two turns around a pin, right next to the head. Snip off the excess. Glue a tiny no-hole bead to the thickened stem for the adjusting knob. These candlesticks often don't have any handle.
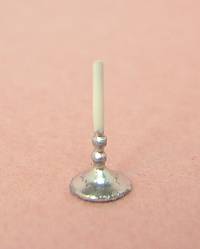
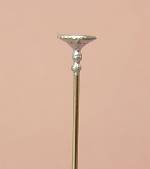
 A pewter candlestick with a yellowish oldfashioned wax candle, and a shiny silver candlestick with a
stearin or paraffin candle.
A pewter candlestick with a yellowish oldfashioned wax candle, and a shiny silver candlestick with a
stearin or paraffin candle.
I cut a tiny paper circle (1 mm or 1/32"), pierced it through the center and glued to the stem near the top (if you're making matching candlesticks, add the circle first of all, to help keep them an equal height).
The heavily curved baluster stem on the "silver" candlestick requires about three layers of glue. For smooth lines, start with adding body to the thickest parts, and let the last layer cover the entire baluster shape (and maybe the base too) to smooth it out. Here, the lower end of the baluster blends seamlessly with the base.