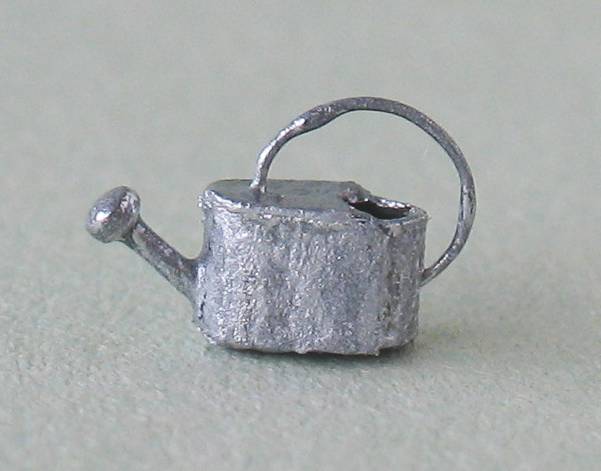
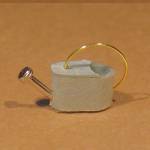
1:144 scale watering can
Idea and instructions by Anna-Carin Betzén
Using these instructions, you can make a tiny watering can of any scale, just by changing the width of a paper strip and the diameter of the rods you shape it around. It may be small or large; low and wide as this one, or tall and narrow.
The length of the body of the can is twice the diameter of the rods, plus three times the thickness of the paper. Its height equals the width of the strip plus the thickness of the paper.
Supplies and tools
- Paper that is a bit sturdier than regular office paper (try scrapbooking paper or other 120 g/m2 paper, index card etc)
- Two thin rods, 1.5 mm (1/16") diameter or smaller (toothpicks, dowels, metal rods... the ends should be cut straight rather than pointed, and mustn't snag when pulled out)
- Dowel or similar, the diameter should be twice the diameter of the rods
- Hole punch of the same diameter as the rods, or a little larger (I used 3 mm (1/8") but 2 mm might be better)
- Paint: black and the color of the watering can
- Small paintbrush
- Thin wire for handle
- Pin with a small flattish head for the spout (or use wire for the spout and add the "rose" to it later)
- Pin for piercing the can to take the handle and spout
- Wire cutters (pins require a heavy-duty cutter)
- Toothpick
- Fine-pointed tweezers (optional)
- Tacky glue
Watering can
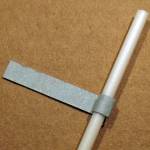
Cut a short strip of paper, its width equalling the desired height of the body of the watering can. My strip is 2.5 mm (3/32") wide, and about 2 cm (3/4") long for ease of handling.
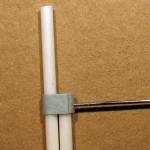
Roll one end of the strip around a rod and glue it closed, forming a tube. Don't glue it to the rod.
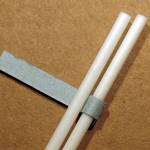
Place the other rod next to the first.
Wrap the strip around the 2nd rod and cut the strip shorter, so it can be glued to the side of the tube formed above.
Glue down the end.
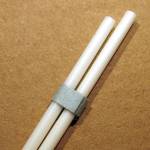
Let the glue dry.
Identify the first rod - the one encased in a round tube of paper. This will be the back end of the can. Pull that rod halfway out, to add stability while you pierce the back of the can with a pin, half-way up.
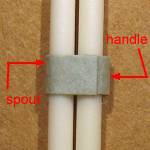
Push the rod back in again and pull out the other rod just a little bit, so you can pierce the other side for the spout (the can is upside down at this point).
Carefully remove the rods, one by one.
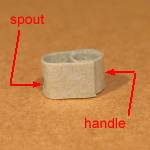
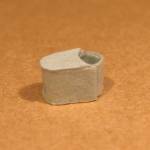
The watering can body should now look like this.
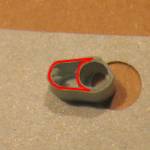
Punch a hole in a piece of paper or card.
Glue the top of the watering can to the paper, the back end of the can extending into the hole. The paper should cover the part outlined in red, leaving a hole at the back.
Let the glue dry.
Trim off excess paper.
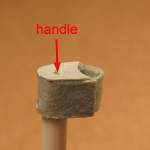
Put a rod in the front space again, and pierce the can to take the front end of the handle.
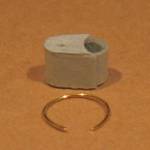
Bend wire around the dowel, and cut nearly a full circle for the handle.
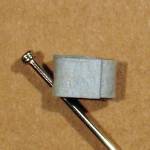
Trial fit the pin for the spout, to see how long you want it. Cut off the excess.
Ease the handle into place. I find this easiest to do with fine-pointed tweezers.
Apply glue from the inside with a pin, to secure the handle and spout. Do the handle first, as you may have to remove the spout temporarily when you apply glue to the front end of the handle.
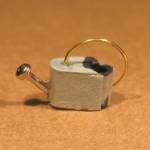
Paint the inside of the can black (i.e., the tubular space at the back - the rest won't be visible at all). This is easiest done from the bottom side of the can.
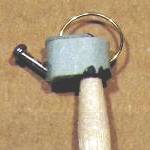
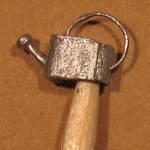
Cut the very point off a toothpick so you can stick the watering can onto it.
If you made the spout from wire and want to add a rose to the spout, now is the time to do it. Try applying a blob of glue to the spout, leave it to dry a bit and flatten it when it's no longer sticky on the surface.
Paint the entire outside of the watering can.
For a galvanized look, use silver paint and if it turns out too shiny, add a grey wash.
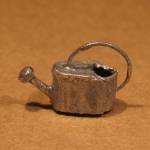
Your watering can is ready to be glued into a setting.
These instructions can be used in several small scales, as you're working from an in-scale sketch rather than fixed measurements. Please visit my garden center for an overview of all my free flower DIYs and other files about making flowers.