Fringing methods for needlepointed rugs (in any scale)
Ideas and instructions by Anna-Carin Betzén
Adding fringe to an Oriental style needlepoint rug makes it look more finished. Cotton thread in a shade similar to natural linen (a light gray/beige) usually looks best. For 1:48 and 1:144 scale rugs on 48 count gauze, I use cotton sewing thread (a single thickness, not doubled). As I don't do larger scales, I can't help you on these. Use your preferred thread, and as many strands as you need to get the density you like - stich a few repeats of the fringing stitch in the margin of your gauze, to see what looks right to you. In the how-to pics, I've used coarse interlock canvas and a single strand of contrasting thread for clarity.
When it comes to antique European Savonnerie or Aubusson type rug, I've never ever seen one with fringe; they just have a smooth edge around all four sides. Modern Chinese reproductions of European rugs may have fringe, though.
Instructions on this page
|
|
|
|
| Turkish knots | Overlapping Turkish knots | Faux tabby weave strip | Finishing a rug |
|---|---|---|---|
| (here shown with a fringe of overlapping Turkish knots) | (especially suited for smaller scales) |
Turkish knots
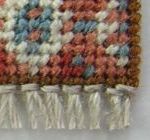
The Turkish knot used in Oriental rugs is also popular for fringing miniature rugs. It works well for 1:12 scale, perhaps also 1:24 scale depending on what count you're working on. This fringe is easy to stitch and has well-defined "knots", one per every two holes in the canvas or gauze. Use multiple strands to get the fringe as full as you like.
As there's a bit of space between the knots, this type of fringe doesn't go very well with my finishing method described at the bottom of this page, as the gauze or canvas shows between the fringes. You'll probably want to fold in a "seam allowance" instead, either before or after stitching.
To stitch a fringe with Turkish knots, follow the instructions for overlapping knots below; just do step 1 to 5 and then continue making identical knots next to each other.
Overlapping Turkish knots
When I first fringed a 1:48 scale rug using the Turkish knot I didn't like the results. The finished fringe only had about 25 knots across, and it looked out of scale to me. So instead I let the knots overlap each other to make the fringe denser. Janet Granger uses a similar stitch on a folded canvas edge in her book, but I found that too bulky in smaller scales. Instead, I leave the gauze flat while stitching the fringe, and then finish as shown on the bottom of this page. This is my own idea, and I think it makes smaller scale carpets sufficiently flat without risking that the edge unravels.
Overlapping Turkish knots work especially well for small scales like 1:48 and 1:144. It yields a dense, even, fringe. You'll probably want to use fewer strands than you would for the basic side-by-side Turkish knots, as there will be twice as many knots (one per hole).
I find it easiest to stitch the fringe while the gauze is still fixed in the embroidery frame. You need to have at least 10 or so meshes of gauze between the ends of the finished needlework rug and the frame to make room for the fringe.


Make a knot and secure the thread about 10 meshes from the stitched edge (1). Push the needle down one stitch from the edge and up again at the very edge (2). Push down one stitch to the right of the original stitch (3) and back up below the horizontal thread (4). (Easiest done if you leave some slack at step 3, and tighten it after step 4.)


Finish the stitch and prepare for the next by taking a stitch next to the knot (5). For the next stitch (and all following), push down in the rightmost hole already used and up in the next hole to the left, above the horizontal thread of the prevous stitch (6). Push down in the first unused hole to the right and back up in the next hole to the left, below the horizontal thread (7).


Continue in the same fashion, repeating the steps showed in pic 6 to 8 until the entire edge is fringed.
Faux tabby weave strip
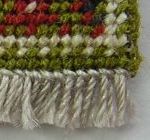
For an extra touch of realism, you can add a narrow "tabby weave" section between the fringe and the actual rug design. Oriental rug collectors often refer to it as "kilim end" or "end finish". It's not just used in hand-knotted rugs, but also in e.g. rag rugs. When the rug is started, the kilim end distributes the warp evenly before the actual weaving or knotting; at the end, it secures the weave or knots of the completed rug so that the warp threads can be cut and tied to create the fringe. I hadn't thought of doing kilim ends in miniature, until June 2006 when a member of the Petitpointers group at Yahoo! asked for other group members' opinions on how to recreate them. I posted my suggestion, and put this illustrated how-to on my website later that month. (Tabby weave is the same as "plain weave" or "flat weave", but tabby is the term I used when writing this tutorial, and the name stuck.)
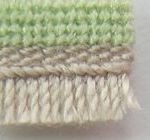
The tabby weave strip generally has the same color as the fringe. I always use cotton sewing thread for both, either a soft grey-beige flax-like color, or ecru, depending on whether the rug has a linen warp or cotton warp (on a real rug, tied off warp threads make up the fringe). Don't use embroidery floss, it will be really hard to see where to stick your needle when you're going back in the same holes.
Unlike needlepoint, tabby weave doesn't cover the canvas or gauze completely. You can see an exaggerated example of this in pic 12 below, which is stitched with disproportionatly thin thread on heavy canvas. Gauze is much more forgiving than canvas as it has a softer color and is semitranslucent, and it blends well with linen and ecru shades. If in doubt, stitch a small sample of tabby weave in a spare corner of your canvas or gauze so see if there's too much contrast, or if it blends nicely.

Some tribal oriental rugs, like the one shown to the right, have kilim ends with color stripes. If you're stitching such a rug you might want to experiment with using more than one color for the tabby weave. (In this case, I used one row each of red, blue, and red.) The gauze shows here and there, as it doesn't blend very well with the colored threads, but it looks okay anyway.
In the illustrations below, I stitch one row of tabby weave (i.e. back and forth) in the same holes as the last line of needlepoint, and one in the same holes as the fringe. If your needlepoint and fringing threads are thicker (i.e. fills the holes more fully), you may want to leave two threads between needlepoint and fringe, and stitch tabby weave in that line of holes only.
I stitched the fringe first and then the tabby weave, but you can do it either way. Frances Peterson in the Petitpointers group at Yahoo! pointed out that she found it easier to start with the tabby weave, and after trying it myself I think so too. My impression is that if you do the tabby weave first, the stitches at the top edge of the fringe will sit slightly atop the tabby weave, causing them to be more prominent - which may be good or bad depending on what type of look you want. (And, you could of course use the tabby weave with another fringing techniqe, if you prefer that!)


If you stitch the fringe first, make sure you leave one (or more) thread of canvas between the needlepoint and the fringe (1). With a single strand of your fringing thread in the needle, secure it as decribed for the fringe (pic 1 in the section on Overlapping Turkish knots). If you're doing tabby weave before fringe, continue with pic 2 from that section. If you started with the fringe, pass the needle through the first knot (2), through the hole right above (3), and up at the very edge (4).


Now for the easy part. Pass the needle over one thread, under one, in the first visible line of holes across the end of your rug (5). When you reach the edge the thread will be either on the front or on the back depending on if your rug has an odd or even stitch count. Turn and go back in the same holes (this time passing over the "warp" where you passed under it before, and vice versa), on the outside of the first row of stitches (6). If you have a very thin thread and coarse canvas, you may want to go back and forth an extra time, always on the outside (fringe side) of the earlier stitches. When you're done with the row, pass the needle through the next hole below at the edge, to prepare for the next row (7).


Stitch in the next line of holes all across, taking care to not catch the top of the fringe stitches as you stitch (8). When you turn and go back, make sure you pass on the outside of the previous row, to preserve the tabby weave structure as shown (9, top). Else you'll get a chain type look (9, bottom). If you mess it up, check out the Fixing errors section below!


If you're doing the tabby weave first, go on to do the fringe (the tread is in the same position as in pic 2 in the section on Overlapping Turkish knots, so just go from there). This will secure the thread.
If the fringe is already stitched, secure the thread by passing the needle down in one hole and up in the next (10), through the 2nd knot (11), and you're done (12). Now you just need to secure the edges. If you want to use the same method as I do, you find it below.
Fixing errors
The tabby weave is a nightmare to unpick, so it's better to hide an error than to unpick and do it over!
When you're going back in the same line of holes, to compete a row, you might find that you've e.g gone under 2 instead of 1 thread somewhere during the first pass across this line of holes. In that case, do a backstitch to fill in the missing stitch, and then switch to stitching on the other side of the stitches for the rest of the row, so the stitches lock together correctly (see the diagram in pic 9 above). If you come across a second error on the same row, hide it as before and again switch to stitching on the other side of the stitches so they line up correctly. It's always better to have a small local error somewhere in the tabby, and then get back in line, than to have the error continuing sideways along the tabby weave, all the way to the edge!
If you've instead gone over 2 threads, try "dividing" the long stitch into two by sticking the needle up through the center hole, around the offending stitch and down again through the same hole. Continue stitching on the other side of the existing stitches, as described as above.
If you're stitching tabby weave in the next line of holes too, and the error will affect that row too, fix the error as above if needed, and switch which side you stitch on to align with the previous row. An error running from the edge of the needlepoint to the fringe will be much less noticeable than one continuing sideways along the tabby weave, all the way to the edge!
Finishing
This method gives a sufficiently neat finish for 1:48 and 1:144, but if you'd prefer to leave a folded-in "seam allowance" or use some other non-glue method, please do.
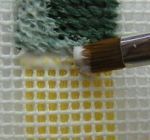
I got the idea for backing the straight edges with glue from a similar approach that some people use: soaking the edges with FrayCheck. Though FrayCheck may very well hold the threads even more securely, I don't recommend it as it often makes the thread appear darker, and even can leave permanent whitish marks if the bottle is old or defective. I've met people who've had that happen to their painstakingly stitched rugs, and they were not happy. In my opinion, glue is a safer choice. I've used this method for many years and haven't had any problems, even on 15 year old rugs, but of course I can't give any guarantees about the glue's possible long-term effects on the embroidery thread or gauze.


After fringing, apply Tacky Glue or similar to the back of the rug, on the last few rows of stitching only. Do this around all edges of the rug, including the fringed ends. Work it in a bit, using a stiff paintbrush, so that it secures the embroidery threads and gauze (1). On the fringed ends, cover the heads of the knots and the first couple of gauze threads outside them, any tabby weave, and a couple of rows of needlepoint. On the other sides apply it to about two or three rows of stitching - try not to get any on the canvas as it could easily push through the holes and soil the right side. Here I haven't finished applying the glue, so you can se about how much I've covered with glue (2).
When the glue has dried completely, cut the gauze and fringe to a suitable length at the ends, and trim the gauze close to the stitching on the other two sides. This makes the gauze at the ends as long as the fringe, and for 1:48 and 1:144 scale I leave it at that. In larger scales you may want to fold the fringe back and trim away some of the gauze, leaving at least two or three rows to make sure it won't unravel.