
Photographing minis
Text by Anna-Carin Betzén
Mini magazines sometimes run articles (or even series of articles) on how to take photos of minis. They're usually written by pros and when I try to read them I feel they're much too complicated. Sure, these pros do get perfect results, but most of us want to get decent quality photos without that much fuss.
I don't know about you, but I want to find easy ways of taking good photos - I'm not interested in photography! Over time, I've found some simple methods that work for me. There are tons of different brands and models of digital cameras, but most of these hints are applicable whatever camera you use - digital or not.
About cameras
Most of the pics on this website were taken with my Nikon Coolpix 2100, bought in 2003. It's a 2 megapixel camera that has optical zoom, and can take pics as close up as 4 cm (about 1½") on the macro setting. Before buying it I had seen and tried several other 2 megapixel cameras in various stores, but they all gave blurry pics close up. The Nikon was infinitely superior and still cost about the same as the others.
By now a 2 megapixel camera is pretty outdated, but keep in mind that more megapixels doesn't necessarily mean your mini pics will be better. Whatever camera you chose, do test its close-up capabilites before you buy it. Bring a mini to the store! Besides getting a chance to try out the camera on the kind of stuff you'll use it for, this also serves to give the salesman a clue to why you're being picky.
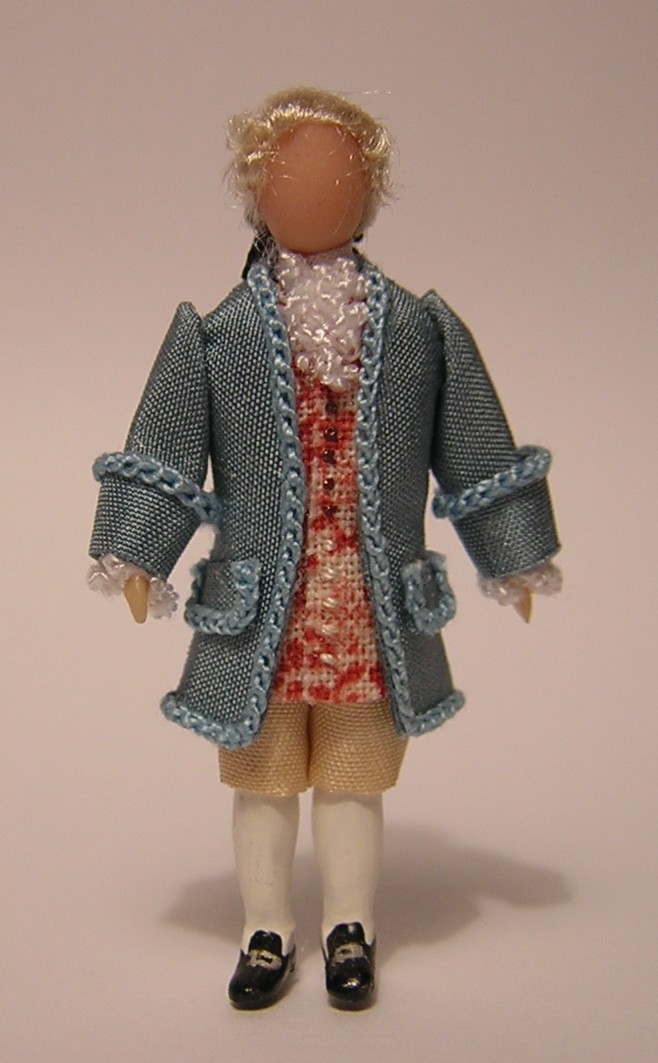
To give you an idea of what a good camera can do - when I photograph minis with my 2 megapixel camera at a 5 cm (2") distance, even the grain of a thin silk fabric shows in the pic. See for yourself here! Some other cameras I've tried gave the minis a blurry outline even at a distance of 20 cm (8"), so they clearly couldn't cope with small-scale minis. As a rule of thumb, if the pic looks blurry on the camera's tiny display, then it's even worse when you see it on your computer screen. If it looks okay on the display, you're on the right track. The cameras usually allow you to leaf through the pics you've taken, and even zoom into each pic to view it up close. This way you can tell for sure if the camera is good enough for photographing minis, while you're still in the shop.
These are words you're likely to encounter when you're shopping for digital cameras:
- Pixels are uniformly sized dots of color that make up a digital pic, just like the stitches in cross-stitch or needlepoint. The more pixels, the sharper and more detailed the pic can be. For digital cameras, the number of megapixels (MP) is given - i.e., how many million pixels there's in a single pic. Pixels don't really have a size in themselves - see the explanation of resolution below.
- Resolution is how many pixels there's in a certain space. This word is used in two different ways: In most circumstances the resolution is given as dots per inch (dpi); e.g. your printer might have 600 dpi and your scanner 1200 dpi. But when talking about digital cameras, the photo doesn't really have a size until it's printed, so then the resolution says how many pixels wide and tall the photo is, e.g. 800×600 or 1600×1200 pixels. When you order real photographic prints from digital photos, 300 dpi seems to be required for a good-quality pic (at that resolution, a 1600×1200 pixel pic will be about the size of an ordinary photo).
- Optical zoom means that your close-up pic will have the same number of pixels as a non-zoomed pic (which is good).
- Digital zoom means that the camera makes a close-up by cropping the pic, leaving you with fewer pixels. So, this results in a poorer quality pic compared to optical zoom. This may be fine if you'll just use the photos for online viewing, but it's definitely a drawback if you plan to order real photographic prints of some of your digital photos.
- Macro is the setting used for close-up photos. It's usally represented by a flower symbol on the camera and in the user's guide.
Camera settings etc
A rule of thumb for 1:48 photography is to take photos of single minis or small rooms using the macro setting. For photos of an entire structure, you may have to turn off the macro setting, and perhaps use zoom instead.
I rarely use the flash. It seems to make close-up photos way too pale, besides creating very sharp shadows.
Respect the limitations of your camera! It's no use trying to get closer than the camera can really handle; that'll just give you blurry photos. Try cropping the photo instead. If the resolution is high and the photo is nice and clear, you can often create a good closeup this way. Zoom doesn't combine very well with the macro setting.
Take lots of photos! If you take a few shots of the same setting, some will be better than others, so take several and pick the best. Real photographers do that, too... And with a digital camera, you don't have to pay for each shot.
Ensure a clear photo
Any photo benefits from being clear rather than fuzzy and blurry! In my experience, it's impossible to take good photos of minis unless the camera is really steady when you press the button. The easiest way to keep the camera steady is by putting it on the table, holding it there with both hands and carefully pressing the button. If you need to raise the camera above the surface of the table you can put it on a steady pile of books, though of course a tripod is even better (if you have one).
Even when the camera is completely steady, the subject sometimes seems to pass in and out of focus (or rather the opposite, really, as the minis don't move). I guess the reason is that the camera is having trouble determining where to focus. In any case, if it looks blurry in the finder, the photo won't look any better than that. Try to change the position of the camera so it can focus again. Remember, if you take several shots you can pick the best ones.
Create a backdrop
I want to show off my minis, not my home, so I usually put some kind of neutral backdrop behind the minis. When photographing interiors, you needn't bother about this, unless there are windows. I collect scenery postcards to put outside the windows when needed.
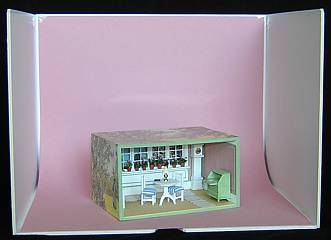 This is the setup I use the most often - a simple photo box fitted with a seamless backdrop. The
DIY section of my website contains full instructions for making it. As you can see, it works very well for an average-size 1:48 scale roombox.
I use it for all 1:48 furniture and people, and everything in 1:144 including houses.
In 1:12 scale it works for most pieces of furniture, and other smaller items.
This is the setup I use the most often - a simple photo box fitted with a seamless backdrop. The
DIY section of my website contains full instructions for making it. As you can see, it works very well for an average-size 1:48 scale roombox.
I use it for all 1:48 furniture and people, and everything in 1:144 including houses.
In 1:12 scale it works for most pieces of furniture, and other smaller items.
When photographing 1:48 scale houses and other larger pieces, a larger backdrop is needed. Cut two or three pieces of heavy white card and hinge together with tape, for a backdrop that can stand on its own but is easy to put away afterwards. Use another piece of the card to put the mini on, so it'll blend visually with the backdrop. If you'll hold the mini in your hand, try to rest your hand (or arm, or elbow) on the table to reduce shakiness.
Look for sky backdrops in model railroad shops - they look great behind mini houses. You can attach one temporarily to your backdrop with masking tape.
Get the height right
Stack books to raise the minis so they look good in the viewfinder (don't tilt the camera, it should rest steady on the table). Think - if you enter a room, what surfaces do you see? Tabletops are clearly visible, while the top of the wardrobe isn't visible at all. For maximum realism you'll want to portray the items from the perspective of an average height person, not as giants or dwarfs would see them.
Once you've got the height right, concentrate on what you really want to show, and making it look good! You can always crop the photos later so it's okay to have lots of other stuff showing around the edges, but keep in mind that the cropping will be parallell to the edges of the photo. You'll quickly learn to plan the photos so you can crop them to get the look you want.
Lighting
Regular bulbs give the pics a yellow tinge. Daylight, or a daylight lamp, is better. Besides daylight fluorescent lamps like the OttLight series, there's also a budget option: buy a daylight incandescent bulb ("grow lights") and put in your regular desk lamp.
For interiors, you have to direct light into the rooms - I use an ordinary desk lamp for this. Experiment with placement to reduce shadows and get a nice look in the viewfinder. If I had room for more lamps on my desk, I'd try using dual (or even triple) lamps, like real photographers do.
If the photo is grainy, you might need more light. If it's very pale, you need less! (Perhaps you forgot to turn the flash off?)
Cropping and other editing
Cropped photos often look better, and they will help drawing people into your mini world. I went to see a big model railroad once, and brought a pair of vintage opera glasses I have. They enabled me to shut out the real-size world, and focus on the mini scenery. This gave me quite a different experience compared to looking without the glasses. I recommend it!
If you don't have any software you can use for cropping, I suggest you download and install the free viewer/editor IrfanView. When I've taken a photo and loaded it into my computer, I open the pic in IrfanView, mark the area I want to keep by pressing the left mouse button and marking a rectangle and then selecting Crop in the Edit menu. If it's a pic for my website I usually need to scale it down, so I select Resize/Resample in the Edit menu and enter the desired size. Finally, I save the pic under a suitable name.