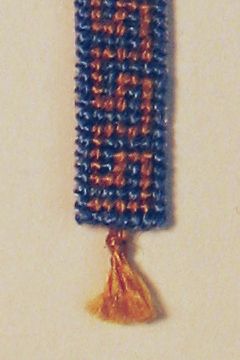
Easy-to-make tassels
Idea and instructions by Anna-Carin Betzén
You could make the easiest "tassel" imaginable by just tying a bunch of threads with an overhand knot, letting the knot form the tassel head. But, that makes a skinny tassel with a huge head.
Instead, I realized that if you insert extra threads into the overhand knot, you can keep the tassel head small and still get a full tassel. You can use these on bell pulls, drapes, etc - anywhere where you can glue them to the back side of a fabric edge.
Supplies and tools
- DMC floss, or your preferred thread
- Toothpick
- Tacky glue
- Optional: silk ribbon
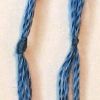
The pic to the right illustrates the difference in size between a regular overhand knot (left) and my modified knot (right).
Making and attaching a tassel
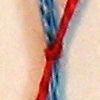
Cut a piece of floss, about 10 cm (4") long. For 1:48 scale, I separate it into 2 + 4 strands, using 2 for the overhand knot and 4 for the insert. Or try different proportions - 2 + 6 strands would make it much fuller, and 1 + 2 might work for 1:144 scale.
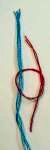
In this how-to, I'm using two different colors to make it easier to follow - red for the thinner part, used for the overhand knot, and blue for the insert.
Form the thinner part (red) into an overhand knot. (If you're unsure what that is, search the web for pics - it's the easiest knot imaginable!)
Insert the thicker part (blue).
Preferably, it should go along with the red thread into the knot, and out of the knot, but don't worry - if you place it the wrong way, this will correct itself as the knot is tightened.
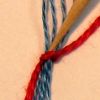
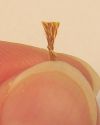
Gently tighten the knot, and use the toothpick to apply a tiny bit of glue inside it as it's closing up.
This will prevent it from coming undone later, in your miniature setting.
Tighten the knot fully.
This may cause the thicker (blue) part to flip over.
That just means it was placed the wrong way at the beginning, and has corrected it by flipping over, so everything's fine.
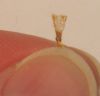
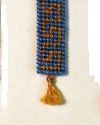
As I'll glue the tassel to a real piece of needlepoint, at this point I'm switching to an identical assembly made in a single color.
Decide which side of the knot looks the nicest. Hold it with the nice side of the knot facing you.
Trim the threads extending from the top of the knot, to say 3 to 4 mm (1/8" to 5/32").
The cut doesn't have to be pretty - this is the half that won't show.
You just want it to glue safely to the back of your work.
Spread glue on it (not on the knot, just on the fringy part).
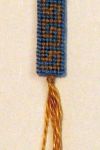
Holding the needlepoint with the right side facing you, stick the gluey side of the tassel to the back.
Nudge it in place, so the knot (a.k.a. tassel head) sits neatly by the edge, like tassels do.
Let the glue dry.
Trim the tassel to length. I made mine 3 to 4 mm (1/8" to 5/32").
Flick the tassel a few times with the tip of your fingernail to unravel the strands slightly.
For a neater back, you can cover the glued down parts of the tassels with a piece of matching silk ribbon.
Additional hints
If you're making several tassels the same color and fullness, you can use several thin strands and a single, longer, insert. Place the overhand knots a few centimeters (about 1") apart on the insert.
For tassels hanging from a slanted edge, e.g. on a draped curtain, make sure they point down (rather than straight out from the edge) when you glue them in place.
You could do stitched on tassels too. Decide how many strands your finished tassel will have, and run half that number of strands through your piece (because you'll use both ends of each strand). All ends should exit as close to each other as possible. Use one or two of the ends extending from the piece to form an overhand knot around all the rest, making sure that all ends exit the knot in the same place (because here, nothing can flip over to correct it when you tighten the knot). When tightening the knot, keep pushing it up against the piece, with the help of a sewing pin - pulling the other end of the strand that is forming the overhand knot will help. Remember to add that little dot of glue inside the knot to secure it.