Silver clay miniatures
Idea and instructions by Anna-Carin Betzén
If you wonder what silver clay is, there's a brief description in my mini glossary. Check your local craft classes, there may very well be a class on silver clay. Or perhaps you know some people who make porcelain dolls, and can bribe them to fire some silver clay objects for you? I won't go into details on firing and such here, but rather concentrate on the potentials of silver clay for making small-scale miniatures. If you have any chance at all to get access to a kiln, I suggest you give silver clay a try!
All the silver minis shown on this page are 1:48 scale. To give you an idea of how little clay you need, I made all the silver items shown here, plus a couple more, from 3 grams (0.1 oz) of silver clay. The clay starts to dry when you open a package, and it's next to impossible to revive if it dries out (you can hardly mold and shape it as fresh clay, only make clay slip from it), so don't buy a lot if you just plan on making a few tiny things.
The basic steps
- Shape objects from silver clay
- Let them dry thoroughly (otherwise, trapped moisture may blow bubbles in the surface during firing)
- If possible, remove excess clay prior to firing
- Fire in a kiln
- Polish the objects to a matte or glossy finish
There are different brands of silver clay, and your class instructor or silver clay supplier will have details on the firing of the brand of clay you're using. When firing, it's crucial that the kiln has good temperature control (too hot - the silver melts into lumps; too cold - the objects will be brittle).
Supplies and tools
- Silver clay
- Optional: Pure silver wire
- Plastic wrap
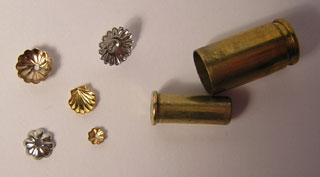
- Findings to use for molds and cutters (see pic - the findings shown are 3 mm to 8 mm (1/8" to 5/16"); the empty gunshells are caliber .22 and .38)
- Sandpaper and sanding block
- Small files
- Wire cutter
- Paintbrush
- Small mixing cup for clay slip
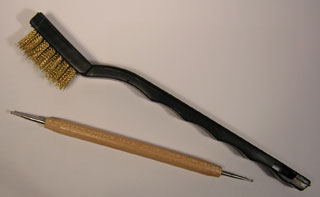
- Small brass wire brush (the one in the pic is a little larger than a toothbrush)
- Ball stylus tool or steel crochet hook
- Optional: Duraglit or other non-abrasive silver polish wadding
Hints on techniques
There are several different techniques you can use, depending on what you want to make.
Using cutters

The round silver plate is perhaps the easiest thing you can make from silver clay.
First, flatten a small piece of clay as much as possible (i.e. to about 0.5 mm or 1/64") between two layers of plastic wrap. Use only a small piece, as the thin leftover pieces of clay will dry really quickly. Punch out the plate using whatever cutter you choose (I used .22 empty gunshell). Indent the center of the plate with a thin dowel or similar, to form a brim. If your plate looks crooked, adjust it now because the thin piece of clay will dry very quickly. Let it dry completely, then sand the edge before firing. Save any dry clay scraps for later - see the section on burnable molds below!
Using push molds
The bases of these dishes were made by using tiny metal findings as push molds, carefully popping out the clay pieces when they had dried.
For the two large dishes (8 mm or 5/16" across), I used metal findings as a combination of cookie cutters and push molds. I pushed flattened clay into a finding and pressed against the edges so the finding cut through the clay. Both dishes were made using the same finding, but I pushed the left one further into the finding to make it more bowl-shaped. When the dishes had dried completely in the findings, I removed them and attached them to the bases with some clay slip (i.e. clay mixed with a bit of water so it can be applied using a paintbrush).
The shell-shaped dish in the background was built up by "painting" layers of clay slip on the outside of a finding, letting it dry for a while between each coat, until it was about 0.5 mm (1/64") thick. When it had dried completely, I carefully removed the clay dish from the finding and sanded the edges where needed.
Using burnable molds
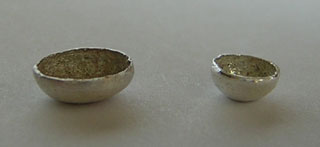
The basic concept here is to build a layer of silver clay around a mold that will burn in the kiln, leaving just the silver object. This technique can of course be used for much more complicated objects than these bowls, e.g. using a wood turning to make an elaborate silver vase. I used moldable cork for the mold, but it has a rough surface so the insides would probably have been smoother if I'd used paper clay instead. I've read that some brands of paper contain a bit of plaster though, and that might leave white traces in the silver surface.
For these bowls, I made balls of moldable cork and let them dry thoroughly. Then I mixed silverclay with a little bit of water to get a clay slip - this is a very good way of using up the small dried-up pieces of silver clay, so if you begin with molding and modelling, you can then make slip out of the scraps (including the dried clay you scrape off your hands as you work). And when you're done, label your mixing cup Silver clay and put it away. Just revive the dry slip with water next time you need it.
I "painted" the slip onto the balls, covering about half of each ball. When the slip had dried, I applied another coat, and so on until the layer of clay was about 0.5 mm (1/64") thick. I tried to get the top edge as even as possible, and when the final layer had dried, I evened out the edge a little with a small file. I also sanded the base of the bowls lightly so they'd sit straight - any sanding is much easier to do before firing than after. When the bowls had been fired, I sanded the top edges a little more by rubbing each bowl against a piece of sandpaper. I finished the bowls simply by treating them with the wire brush, so they have a matte finish.
Sculpting
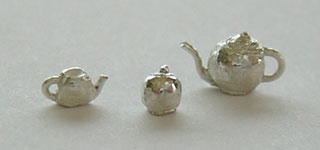
The teapot, creamer and sugar bowl were all made by shaping clay around a piece of pure silver wire (available from suppliers of silver clay; apparently sterling silver isn't pure enough to be used together with silver clay). Hint: leave a bit of wire sticking out to make these tiny objects easier to handle. Trim the wire with cutters and files after polishing.
The sugar bowl was the easiest one - I pushed a bit of wire into a small ball of clay, flattened the base and used a drinking straw to indent a circle around the wire at the top, to suggest the lid.
For the creamer I shaped a single piece of wire to form both handle and spout, and then added clay around it. I painted some clay slip onto the bottom of the spout to thicken it. After firing, I drilled a hole at the top and painted the inside white for cream.
The teapot has both spout, handle and lid knob made from one continous piece of wire. I shaped a ball of clay around the wire, impressed a lid shape, and thickened the base of the spout with clay slip.
Polishing
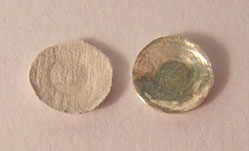
When silver objects have been fired, their surface is a dull white as the silver surface has had a chemical reaction with the air during firing. Polish the objects gently using a brass wire brush, so the matte silver finish shows. If you want a glossy finish, burnish with a smooth steel tool afterwards (like a ball stylus tool or a crochet hook). The burnishing tool leaves slight traces in the surface, but I found that they can be reduced by polishing it with Duraglit polish wadding afterwards. When I made these silver minis, I was tempted to skip the wire brush and start with the ball stylus tool instead, but I soon learned that only the wire brush can remove all the white coating. If there's white coating left in small crevices on the surface, it really makes them stand out and detract from the appearence of your mini silver treasures.
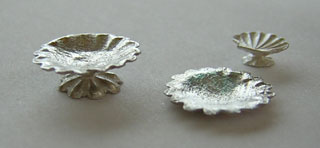
In the pic to the right, you can see what difference the polishing makes. The left plate looks just like it did when it left the kiln, while the right plate has been polished with the wire brush and then burnished. I think I may have used Duraglit wadding on it, too.