
1:48 scale ceiling medallions
Idea and instructions by Anna-Carin Betzén
My ceiling medallion instructions were first published in the Little Enough News group on Yahoo, in July 2002.
Supplies and tools
- Ornamental buttons
- Polymer clay or mold-making material
- Plaster of Paris
- Sandpaper
- White paint
- Fine drill (optional)
Mold-making
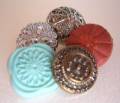
Look through your buttons to find 10 to 12 mm (3/8" to 1/2") buttons with a nice raised design (metal or metal look buttons often have the best designs). The over-all shape of the buttons should preferably be rather flat.
Make a push mold from light-colored clay. If you don't harden it, you can probably only use it once; if you harden it, the cast may break when you remove it. Experiment to see what works best! If you have some mold-making material, make a mold according to package instructions. I flattened some modelling clay in the bottom of a small container, embedded the button shanks in the clay, and poured the mold material over them.
Make several molds if possible, so you can cast multiple medallions at the same time.
Casting and finishing
Mix a small quantity plaster of Paris and cast your medallions. Tap the molds sharply a few times to shake loose any bubbles of air trapped in the plaster. Leave to dry overnight.
Sand the back flat and level. If you plan to suspend a chandelier from it, drill a hole in the center. Paint the medallion white (you may want to thin the paint, so the detail of the cast isn't lost) and glue it to the ceiling.
Of course you could also just cut the shank off the button, paint it, and use it as it, but then you wouldn't have a bunch of neat little ceiling medallions to share with your friends or in swaps...