1:144 scale urn
Idea and instructions by Anna-Carin Betzén
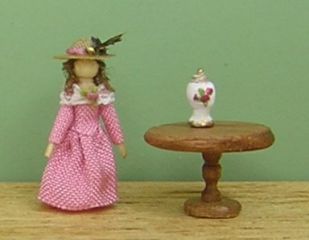
Lidded urns were popular in the late 18th century, so I made one to go on the mantleshelf in the bedroom of my Georgian townhouse. A lidded urn might've contained potpourri, or been used just as an ornament.
This project does require some patience; you'll repeatedly need to wait for the glue to dry, and putting a base on the urn requires lots of fussy adjustments to the parts' positions.
The base of the urn is sculpted with glue, an idea I got from a miniature magazine article featuring master micro-miniaturist Nell Corkin. In the article there was a pic of one of her settings, with a four-poster bed in it. The incredibly slender bedposts looked like they were turned, but the caption explained that they were made from pins, and that she'd used glue to create the turned look.
Near the bottom of this page I'm also describing a fun painting technique I came up with myself.
Supplies and tools
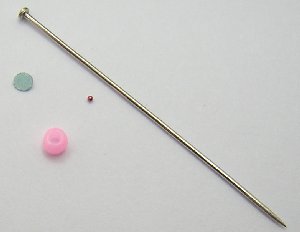
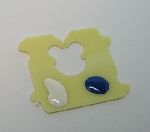
- A 1.6 mm (1/16") circle punched from thin card
- A seed bead, about 2 mm (5/64") in diameter (I used an 11/0)
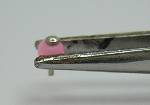
- A sewing pin - it has to fit through the hole in the bead, and must have a small head as shown in the pic
- A tiny no-hole bead (the smallest size, about 0.5 mm or 1/64")
- Heavy-duty wire cutter
- Reverse tweezers
- Tacky glue
- Cyanoacrylate glue
- Toothpicks
- A piece of spaghetti (uncooked)
- Paint - preferably one of the brands sold for use in plastic modelling or wargaming, as they stick well to plastic. There are both water-based and solvent-based brands.
Making the urn
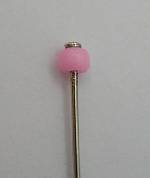
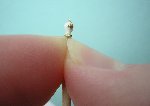
Glue the bead to the pin with cyanoacrylate glue.
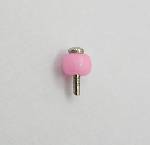
Next you'll cut the pin, but do read these warnings first. BE CAREFUL!!! The pin will break with a snap and jump away, and you don't want it in your eyes!
To minimise the risk that anything goes wrong, I position the wire cutter for the cut, hold it over my worktable, cup my other hand over it, close my eyes and squeeze the cutter.
It's important to use a proper heavy-duty wire cutter, not a fine precision tool, otherwise you'll spoil the cutter (in the best case, the jaws just get jagged; worst case is that part of the cutter's jaws snap off from the excessive tension and jump off in some unexpected direction - it happened to me once).
Taking the precautions described above, cut the pin about 1.5 mm (1/16") away from the bead. Dispose of the pointed part of the pin in some safe manner.
Place the assembly in a reverse tweezers.
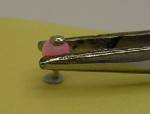
Stick the punched curcle onto the tacky part of a post-it note. Lay the tweezers on its side and position it so that the pin/bead assembly sits straight and the base of the pin
touches the circle (like in the candlestick instructions). You'll probably need to stack some bits of card under the post-it note to make this happen.
Remove the tweezers temporarily, cover the card circle with a glue blob and put the tweezers back. Try to center the pin on the glue-covered circle.
Let it dry completely before you peel off the post-it note.
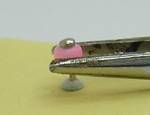
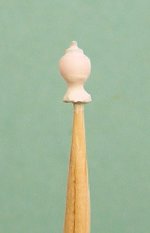
This is what it'll look like when dry.
(As you can see, I didn't get the pin quite in the center of the circle, but a little off is alright. If the placement turns out to be downright catastrophic, peel it off and start over with a
new card circle.)

Use glue to "sculpt" a smooth transition between the bead, pin and card circle. Take special care to create a smooth transition against the bead. Let it dry completely.
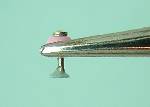
You may find it easier to see what you're doing if you glue the base lightly to the tip of a toothpick (use as little glue as possible, to make it easier to pry it off later). You'll need to do
it about now anyway, so you can paint it.
You'll probably need to apply a second layer (maybe even a third) for a nice shape. Each time, let the glue dry completely before you proceed.
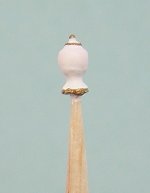
When you're happy about the shape of your urn, it's time to add the knob on the lid.

Put a dot of cyanoacrylate glue in the center of the pinhead.
Moisten one end of the spaghetti straw, pick up the no-hole bead with it, and place it in the glue.
Again, let the glue dry completely before you continue.
Painting
Paint the entire urn with your chosen main color. The paint may want to pool in the crevices around the knob,
and the edge of the lid. In that case, wipe your paintbrush and remove the excess paint at once.
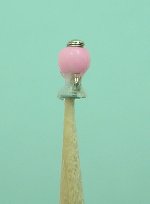
When the basecoat had dried, I applied gold paint on the knob and around the edge of the lid and base.
Green dots for leaves, applied with a toothpick...
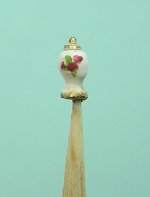
... and pink dots for roses, applied when the leaves had dried.
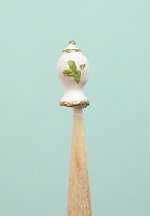
A different approach to painting
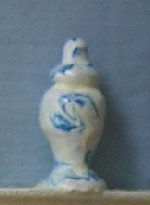
Here's how I painted the urn in my Georgian townhouse. Do try the technique on a scrap surface before you use it on your urn, because I can't guarantee that your choice of paint behaves exactly as mine did (I used Testors' Model Master enamel paint).
The accent color paint you're using has to be of the same brand as your main color, so that they're fully compatible. Also keep in mind that the colors need to contrast or the design will be too pale to be visible. My accent paint was a fairly dark cobalt blue.
Paint the entire urn in your main color as above. When the paint has dried, place a drop each of the two paints on e.g. a bread bag clip. Dip the pointed end of a pin first in the accent color, then in the main color. Apply the resulting blob to the urn and make some swirls with the point of the pin. Wiping the pin before swirling might change the effect.
When you think about it, this technique opens great possibilities. E.g., you could use it in green + white to create some graceful greenery, and when that had dried you could use red+pink here
and there to make roses that would look incredibly detailed. Perhaps you could also dip the pin in three colors for different effects.
Nearly finished
All that remains to do, is to remove the urn from the toothpick. After all the work you've put into it, it would be a shame to break it! I gripped the toothpick between my thumb and index finger, and used them to gently ease the urn off. Cup your other hand over it, so it doesn't jump away either!
Now glue your urn into a setting before you lose it... mine skipped away while I was taking the final photos of it, and I spent quite some time searching before I finally found it.