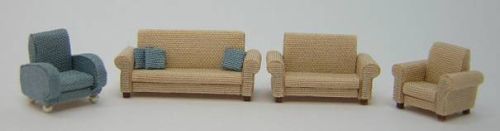
1:144 scale sofa and chairs
Idea and instructions by Anna-Carin Betzén
Build yourself some classic 1:144 scale sofas and chairs using only stripwood, fabric and glue. There's an optional Art Deco arm design too (the blue chair in the photo).
Supplies and tools
- 1.5×6 mm (1/16"×1/4") stripwood for the back. If you want a lower back, you can substitute e.g. 1.5×5 mm (1/16"×3/16")
- 1×4 mm (1/32"×5/32") stripwood for base, back, seat and arms. If you want a lower back, you can substitute e.g. 1.5×5 mm (1/16"×3/16")
- For classic style arms: Half round wood strip. I used 3/64" (you can also round two edges of a strip of H0 2×4, or sand down a toothpick to about 1.25 to 1.5 mm and split or sand it to a half round)
- For legs, some H0 2×2 (0.6×0.6 mm or about 1/32"×1/32"), or large no-hole beads or whatever you prefer to use
- Chopper or scalpel for cutting
- Sandpaper and/or files for shaping
- Tacky glue
- Blouse weight silk fabric, or other thin fabric (or the very thin leather called skiver - make sure it's soft, not the stiff kind)
- Sharp scissors
If you're using metric sizes of stripwood, stick to metric measurements throughout; if using imperial sizes, use imperial measurements throughout.
Check out the Hints and guides section of the site for additional information about the wood types I use, hints on cutting and and finishing, and preparing fabric for small-scale use.
Preparing the fabric
If you use skiver instead, skip this step!
Put a small piece of fabric on a flat surface and carefully spread a bit of glue on the back. Don't apply any pressure; that would make it bleed through to the front. If you make a few attempts and still can't get it to work, try another fabric. (If you want more in-depth instructions with illustrations, go to my fabric hints page!)
When you've succeeded in coating the back with glue without it bleeding through, leave it to dry for at least half an hour. The glue skin on the back will keep glue from bleeding through when you glue the fabric to the furniture, and it will also prevent fraying.
Sanding and cutting
The seat and back need to be shaped a bit, and it's easiest to sand the woodstrip before cutting the individual parts. Cut a piece each of the thick and the thin stripwood, about 5 cm (2") long (that's enough for making a couple of sofas and a few chairs).
![]() Start with the thickest piece, the back. Take off quite a bit on the upper front,
as shown. Files come in handy here. Note that only the upper half or so is shaped,
don't go all the way down to the lower edge.
Start with the thickest piece, the back. Take off quite a bit on the upper front,
as shown. Files come in handy here. Note that only the upper half or so is shaped,
don't go all the way down to the lower edge.
When you've created a nice smooth shape, round the upper back corner too.
![]() For the seat, just round the front edges of the thin piece. Though, if you're
feeling really ambitious, you can also take off a bit on the bottom back to make
the seat slant a bit:
For the seat, just round the front edges of the thin piece. Though, if you're
feeling really ambitious, you can also take off a bit on the bottom back to make
the seat slant a bit: ![]() Use a pencil to draw a wavy line on the bottom side so you can tell the seat from the other parts.
Use a pencil to draw a wavy line on the bottom side so you can tell the seat from the other parts.
| metric | imperial | |
|---|---|---|
| chair | 4 mm | 5/32" |
| loveseat | 8 mm | 5/16" |
| sofa | 12 mm | 1/2" |
Now it's time to cut the base, seat and back parts, i.e. from the two pieces you've already shaped plus an unshaped bit of the thin stripwood.
Each piece of furniture needs one bit of each woodstrip, of the length specified in the table. Don't worry about the arms yet, we'll do them later so we don't mix up the parts.
Assembly
Cut some narrow strips from the silk fabric you prepared, on straight grain if you can manage. They should be about 2 to 3 mm (3/32" to 1/8") wide.
Here's a hint to remember: When you glue fabric to wood, always try to spread the glue on the wood part, then press the fabric in place. It's the least messy way, believe me! If little blobs of glue appear around the edges of the wood, wipe them off at once with the tip of a toothpick.

Now you're ready to go. Start with the base - that's the piece that doesn't have any rounded edges, nor any wavy pencil line.
In the sketch to the left, the striped area shows the wood grain direction of the base, and the heavy line is the fabric strip. Glue the front edge (which is always on straight wood grain) 5 mm (1/4") or so from the end of the fabric strip. Then fold and glue the strip ends to the wood end grain. Let the glue set for at least a minute or two before you trim the fabric flush with the edges. Whenever you handle a part that has untrimmed fabric edges around, take your scissors and trim them off.
There's no sketch for this step, but on each and every of your seat and back pieces, you have to glue fabric bits to the end grain only. Let dry and trim the excess when the glue has set.

Take a back piece and a matching base, and glue together (you've already trimmed off any excess fabric, right?).
The fabric covered edges of the base will all be visible, it's the bare wood on the 4th side that is glued. Also, make sure that the slanting side of the back is facing forward.

Next, cut a fabric strip that's a little wider than the base or back. Spread glue on the front of the back, and apply the fabric starting at the inside corner where the base joins the back. Press in place to secure, then spread glue on the top and back sides and press the fabric in place there too.
There'll be excess fabric at the left/right edges and extending below the back, trim it off as ususal when the glue has dried.
The seat has to be covered too. Use a strip the same width as in last step, and start and end on the bottom of the seat. Like on the back, I do this step by step: Spread some glue on the front 1/3 of the bottom (the bottom is the side with the wavy line drawn on it), and attach the end of the fabric there. Now you can hold on to the fabric strip while spreading fabric on the rounded edge and the entire top side. Press the fabric in place in the glue. Turn over and eyeball the visible width of the wood, and trim the fabric at a similar distance from the edge. Apply glue to edge and the rest of the bottom, and press the fabric in place.

Glue the seat in place on the back/base assembly. Make sure you put the rounded edges forward!
If you have Lego blocks handy, use them to check that all parts line up at the left and right edges.
Arms - classic
For each sofa or chair, cut two 5.5 mm (7/32") pieces each of your thin stripwood and the half round wood strip.
Glue a half round piece to the upper part of each arm piece, along the wood grain.
Round the opposite corner of the arm.
Apply fabric to all end grain surfaces on the arms. Trim off excess.
Cut a fabric strip a little wider than the arm piece, and glue on. Push with the tip of your fingernail to define the angle on the outside of the arm. Trim off excess.
Arms - Art Deco
This is the style I used in my Florida Art Deco house, with large no-hole beads for legs.
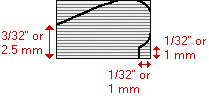
For each sofa or chair, cut two 6.5 mm (1/4") pieces of your thin stripwood.
Shape each of them according to the diagram.
Apply fabric to one flat surface of each arm, trim off excess. Repeat on other side.
Cut narrow strips from silk fabric, about 2 to 3 mm (1/16" to 1/8") wide. On each arm, glue a continuous strip to the front, top, and back of the arm. Trim.
Finishing off
Glue the arms to the ends of each sofa and chair, back and bottom edges aligning.
Glue legs under each end of the arms, I used H0 2×2 stripwood (stained and finished with Danish Oil, then cut with the chopper), each leg 0.75 mm (1/32") long (or a little longer, if you'd like). Of course you can also use large no-hole beads (make sure they're an even size), or seedbeads, or whatever you like.
Pillows
Treat a bit of contrasting fabric with glue.
Cut some 2 mm (3/32") squares from index card (or similar thin card).
Secure one of the card squares to the back of the fabric with a tiny dab of glue. Its edges should run on the bias, not along the grain (this helps making the corners neat).
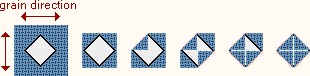 Proceed as shown in the sketches -
- Trim the fabric along the grain, close to the tips of the square.
- Glue the four flaps to the square, one by one.
When done, turn the pillow over! Bend it into an attractive shape and glue in place.
If you want a pillow with real padding, try gluing the card square to a tiny bit of cotton wool and trim off the excess, then glue it to the fabric (cotton wool side down) and proceed.