
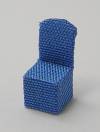
1:144 scale slipcovered chairs
Idea and instructions by Anna-Carin Betzén
Build yourself some easy-to-make slipcovered chairs using only stripwood, thin card, fabric and glue. Step-by-step illustrations guide you through the process, but it's so easy that you can do them by heart after you've made a couple.
The green chair is the most basic design of these three. The pink chair has a shaped seat for added realism, and the blue chair has a curved edge on the top of the back. Both of these options are included in the instructions.
I suggest that you make a single chair first to try the technique, then make your full set of chairs assembly-line style. It's best if the glue has time to set for a minute or two before you move on to the next step, and by making a few chairs at once you'll never have to wait for the glue to dry...
Supplies and tools
- Stripwood: 3×3 mm (or 1/8"×1/8", or H0 10×10)
- Index card or other thin card
- Chopper or scalpel for cutting
- Tacky glue
- Blouse weight silk fabric, or other thin fabric
- Sharp scissors
- Optional: Sandpaper for shaping
- Optional: Scalloped craft scissors
Check out the Hints and guides section of the site for additional information about the wood types I use, hints on cutting and and finishing, and preparing fabric for small-scale use.
Preparing the fabric
Put a small piece of fabric on a flat surface and carefully spread a bit of glue on the back. Don't apply any pressure; that would make it bleed through to the front. If you make a few attempts and still can't get it to work, try another fabric. (If you want more in-depth instructions with illustrations, go to my fabric hints page!)
When you've succeeded in coating the back with glue without it bleeding through, leave it to dry for at least half an hour. The glue skin on the back will keep glue from bleeding through when you glue the fabric to the furniture, and it will also prevent fraying.
Making the base
Back: Cut a strip of card, the same width as your stripwood. For each chair, cut a piece of the card strip. I used 7 mm (9/32"), but you can vary the height of the back as you please.
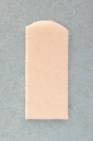
(Optional: rounded top edge -- With scalloped craft scissors, it's easy to give the chair back a curved top edge. Simply center the piece of card on one of the scissors' scallops and cut.)
Seat: Cut a 3 mm (1/8") piece of stripwood for each chair. Check that the cut edges of the stripwood cube are neat and flat, and that it sits straight when you set it on one end. If not, sand it and check again.
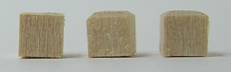
(Optional: shaping the seat -- The leftmost cube is what it looks like when cut from the strip. For increased realism, you can shape the top: Sand a 45° bevel as shown on the center cube. Then smooth the top edges of the bevels so they blend into the top, as shown on the last cube. The edges where the bevels meet the sides should be left as is.)
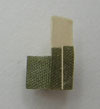
Whether you've sanded the top edges of the stripwood cube or not, now is the time to glue the cube to the piece of card, bottom edges flush. The end grain should face up and down.
Covering with fabric
Cut strips from your pretreated fabric, one 5 mm (3/16") wide and the other 7 mm (9/32") wide. If your fabric has a direction, the narrow strip should run crosswise and the wide strip lengthwise.
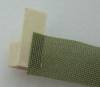
The narrow strip will be used to cover the wood cube, with the ends meeting in the center of the back. You need a strip that is at least 15 mm (5/8") long.
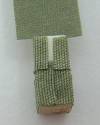
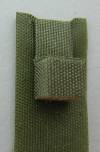
Glue one end to the back as shown.
Spread glue on the next side of the cube, bring the fabric around the corner and press into the glue. Repeat for the next two sides. Eyeball the bit needed to finish off the back, cut off the excess and glue the flap in place.
Let the glue set for a couple of minutes, then take your scissors and trim off all fabric extending beyond the wood's edges (if you're using the shaped chair seat, cut where the bevel meets the side). When I think I've got it all, I go back and look again, and often see that I can trim off another tiny bit somewhere. The more carefully you trim the fabric, the better the finished chairs will look (but try not to cut off wood slivers in the process).
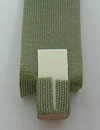
Now you need the wide fabric strip - make sure it's at least 20 mm (3/4") long. Spread glue on the chair seat and on the front side of the back. Cover these with the fabric strip, beginning at the front of the seat (leave a little bit sticking out), pushing the fabric into the seat/back angle with your finger nail, and leaving the rest of the strip sticking out at the top (if you're using the shaped chair seat, make sure you glue the fabric to the entire top, so it meets the fabric at the sides).
Make four cuts, as indicated by the black lines in the pic. Two meet the top corners of the back, the other two end where the back meets the seat.

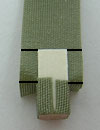
The cuts created two little flaps. Glue these to the back, as shown here.
Trim off all excess fabric around the seat.
Now you have to select track. If your chair has a straight top edge, continue to the left (green fabric). If it's curved, follow the instructions to the right (blue fabric). The blue fabric instructions are also useful if you have a very directional fabric and don't want to end up with the fabric design upside down on the back of the chair.
| Straight top edge | Curved top edge |
|---|---|
|
If you want a challenge, trim it with ribbon bows...
|
|
 Spread glue on the entire back side of the chair. Fold the fabric over and press down. Curve the back slightly into an attractive shape, and leave to dry thoroughly.
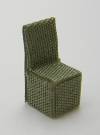 Trim off all excess fabric. Voilà - a slipcovered chair!
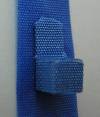
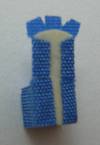 Trim the fabric about 1.5 mm (1/16") from the top edge of the back. Cut a couple of notches in the flap.
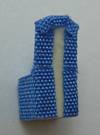 Here the flaps have been glued down.
 Spread glue on the entire back side of the chair and stick it to the fabric strip. Curve the back slightly into an attractive shape, and leave to dry thoroughly.
 Trim off all excess fabric, and your slipcovered chair is finished.