
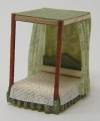
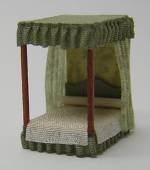
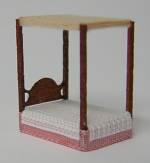
1:144 scale Georgian four-poster bed
Idea and instructions by Anna-Carin Betzén
This bed isn't the quickest and easiest project to start with, nor is it impossibly difficult. It's just that there are several steps involved, so it takes a while to complete it. I've tried to make the instructions as clear as possible, with lots of pics. Unfortunately, this also means that they take up a lot of pages when printing! Especially as there's instructions for a Colonial adaption too at the very end of this page.
Supplies and tools
- Stripwood: 3×10 mm (1/8"×3/8") for base,
1×10 mm (1/32"×3/8") for the canopy (or use larger sizes, as suggested above) - For bedposts, H0 2×2 scale lumber (or 1/32" square, or 1/32" dowel, or what else you'd like to use)
- For cornice, H0 1×2 and H0 1×4 scale lumber
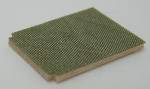
- PaperWood
- Index card or other thin card for headboard
- A scalpel for cutting (preferably a chopper too)
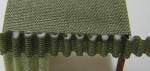
- Decorative scissors with a symmetrical design
- Regular scissors for cutting card and fabric
- Sandpaper
- Thin silk fabrics
- Optional: 2 mm silk ribbon
- Fabric pleater built according to Frances Armstrong's instructions on her page about tools
- Mahogany stain
- Danish oil or other clear finish
- Tacky glue
1780's four-poster
Four-poster beds are pretty large (not to say huge), but dollhouse rooms are often fairly small. So, in the instructions below I give measurements for the smallest size I think a four-poster bed could be and still be reasonably in-scale. If you have room for a larger bed, making it 11 mm (7/16") wide and 14 mm (9/16") long would make it more typical in size (a state bed could be even larger). Also, the beds were made as tall as the room would allow, with the canopy stretching nearly to the ceiling (say 2 to 3 mm (3/32" to 1/8") less than the ceiling height). Check out the Hints and guides section of the site for additional information about the wood types I use, as well as hints on cutting and finishing.
My Georgian bed has mostly been inspired by the book "The Cabinet-Maker and Upholsterer's Guide", containing George Hepplewhite's drawings. He died in 1786 and the book was printed by his widow. I've used a Dover reprint of the 3rd (1794) edition, but the entire book is also available online at www.furniturestyles.net.
Preparing the fabrics
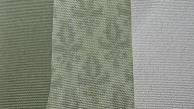
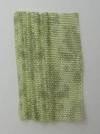
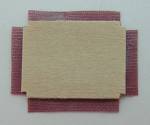
Decide which fabric(s) you want to use for the bedspread, the canopy and the hangings. Use as many or as few fabrics as you'd like, but keep in mind that wherever a lighter color overlaps a darker color, the dark color might show through. Here, I'm using three different silk fabrics (one is a small-scale printed silk from Brodnax Prints). The dust ruffle can be made either from a strip of fabric, or from silk ribbon.
Prepare a 2.5×2.5 cm (1"×1") bit of the canopy fabric by spreading glue on the back as described on the fabric hints page. Also, prepare similarly sized pieces of the fabrics you want to use for the for the hanging behind the headboard, and for the bedspread. The padded headboard will need a small piece too.
Cutting and assembly
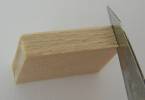
Stain a 4 cm (1½") piece of your chosen bedpost material. Apply your clear finish and let it dry.
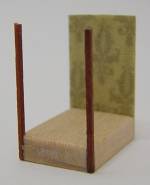
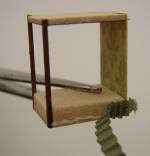
- Cut one 12 mm (½") piece each of the thick and thin stripwood sizes. From now on, I'll refer to these pieces as the base and the canopy of the bed. The canopy is the thinnest one!
- Cut two bedposts 16 mm (5/8") long, from the thin square or dowel that you stained.
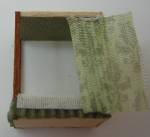
- Cut a piece of PaperWood to the same width as the bed and the same height as the bedposts (10×16 mm or 3/8"×5/8").
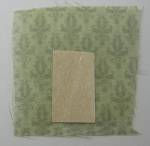
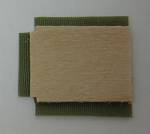
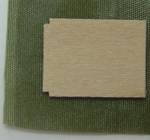
Spread glue on one side of the PaperWood piece you cut, and place it centered on the piece of fabric you prepared for the hanging behind the headboard. Weigh it down until dry, to prevent warping. Trim off the excess fabric. (The fabric I used here is so transparent that it looks as though I've glued it to the right side of the fabric, but it's actually the back!)
Notch one end of the base and canopy pieces, to take a bedpost in each of the two corners. Leave the other end as it is, without notches! Here's how I do the notches:
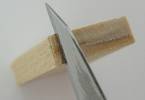
First mark out the thickness of the bedpost, then make a shallow cut from the long side (across the grain) and next a cut from the end grain. I found it easiest to make the cut from the long side really shallow, then shave off just a little bit from the end grain (cutting very close to the edge, not at the line). Deepen the first cut a little, then shave off a bit more, until you reach the line.
Round the top edges of the base slightly with sandpaper - there won't be any mattress or other padding beneath the bedspread, so you'll want the top of the base to have a soft shape.
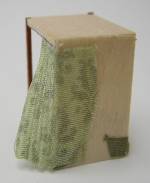
Cut the bedspread fabric 1.5 to 2 mm longer and 3 to 4 mm wider (1/16" to 3/32" longer and 1/8" to 3/16" wider) than the base and canopy.
Using the canopy as a template, cut away squares at two of the corners of the fabric, reaching from the notches to the edge. Do NOT glue, it's just a template! Notice how the template is placed on the fabric - head end flush with the edge.
(My actual bedspread fabric is white, but on this photo I used a different fabric for better contrast.)
 Glue the canopy piece to the canopy fabric. Weigh it down until dry, to prevent warping.
Trim off all the excess (even in the little notches) when the glue has set. The pic to the right shows what the fabric-covered side will look like when finished.
Glue the 'notchless' side of the base to the fabric side of the PaperWood piece. The rounded edges should face up.
Glue the two bedposts into the notches (if the glue doesn't want to stick to the finished surface of the posts, scrape off the finish in those areas, and on the top 1 mm (1/32") too).
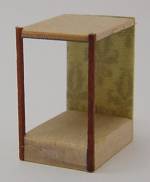
Glue the canopy in place, fabric side down. It should fit between the PaperWood piece and the bedposts, like the base does.
Make sure everything is nice and straight before the glue dries, Lego blocks may be helpful here.
Prepare the cornice
Stain about 10 cm (4") each of H0 1×2 and H0 1×4. Glue them together, one side edge flush. Let dry, then apply your clear finish. Leave them to dry completely.
Dust valance
The quickest and easiest way is to make a dust valance use a silk ribbon, glued flat, but I think a pleated valance looks better. You choose!

Plain valance: Spread glue around the base, perhaps waiting a little so it gets tacky before carefully applying the ribbon, flush with the bottom edge. Start and end behind the head end of the bed. (Here, it's shown on a Colonial bed.)
Pleated valance: You need about 7 cm (3") of silk ribbon. Or, cut a 2.5 mm (3/32") strip of fabric and secure the edges with glue or paint as described on the fabric hints page. Pleat the ribbon or fabric strip in Frances' pleater, I had to do it in two passes as the strip is fairly long.
Clamp the base in reverse tweezers, so you don't mess up the valance by holding it while the glue is still wet (like I did!). Run a line of glue close to the bottom edge of one side of the bed, as shown in the pic. Pat the pleated strip in place, flush with the bottom edge. The lower half of the valance should be glued to the base, while the upper half is loose.
Let the glue dry for at least a few minutes, so the valance stays put.
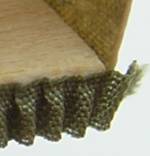
Next, apply glue behind the top portion of the valance. Squish the top edge of the folds into the glue, so it doesn't stand out. Use the point of your fingernail or some other suitable tool. Don't worry if the folds pop out again, I had to keep pushing them in at various places for a while until all stuck permanently to the glue. When everything stays put, leave it to dry.
Repeat on the other two sides, one by one. At some point you'll have to move the tweezers to reach everywhere. Finish off either by just cutting off the excess at the head end (apply a little glue to prevent fraying), or by cutting the ends short and gluing them to the back of the bed.
Bedspread
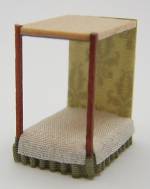
Check that your bedspread still fits, then spread some glue on the top of the base and fit it in place. Add some dots of glue under the edge too, to make it drape over the edge.
Headboard
Several of Hepplewhite's drawings show beds with padded headboards, and the book points out that The addition of stuffed head-boards gives an elegant and high finish to the appearance of beds. You can adapt these instructions to make nice headboards for modern beds too (in that case, make them taller and glue them behind the base).
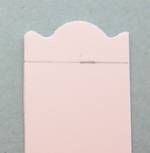
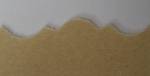
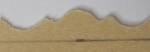
Cut a strip of card, the same width as the base. With your decorative scissors, cut across it, positioning the scissors so you get a symmetrical design.
Mark the lower edge of the headboard, about 3 to 5 mm (1/8" to 3/16") from the top at the center of the strip, and cut off with regular scissors.
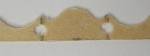
Glue the headboard to a piece of prepared fabric. Trim along the card edge on the bottom. If your bed will have hangings, you can trim the left and right edges too, as shown. Trim about 1.5 mm (1/16") from the remaining edge(s), notch where needed and glue the flaps to the back.
Glue the headboard to the bed.
Bolster
All the beds in Hepplewhite's drawings have bolsters, and they're fairly easy to make once you get the hang of it.
Take a strip of prepared fabric that is at least 5 mm (3/16") wider than the bed and curl one end into a tight roll. The finished roll should be about 1.5 mm (1/16") in diameter. Keep trying until it works fairly well for you.
Spread some glue on the inside of the fabric to get it to stick, and try rolling it up again. (If you can't get it to work, try curling it around a sewing pin instead, but try not to glue it to the pin - push it off the pin before the glue dries.) Trim off the excess fabric, and cut the roll to fit the width of the bed. If you plan to skip the hangings, glue bits of prepared fabric to the ends of the roll and cut off the excess.
Glue it to the head end of the bed, turning it so the join won't show.
Hangings and canopy
In the late Georgian era, wealthy homes were warmer and more comfortable than before. Bed hangings now tended to be decorative rather than used for warmth, so they were often found at the head of the bed only.
Measure the height of your bed, from the floor to the underside of the canopy. Cut a fabric strip this wide, about 5 cm (2") long. You won't need that much really, but it makes it easier to hold. Secure the long edges with glue or paint. You need about 4 to 6 pleats for each of the two hangings. Decide how many pleats you want and cut off the rest, leaving a flat gluing tab at one side. Secure the cut edge with glue.
Dab some glue on the top edge of the actual pleats only, and stick it against the underside of the canopy. The front of the pleats should be flush with the edge. You may need to grasp the fabric with tweezers and hold it against the canopy to make it stick.
Glue the flap to the back of the bed, and go on to add the hanging on the other side.
It may be possible to drape the hangings if you like, but I haven't tried it!
The hangings will probably flare at the base. If so, glue them against the edge of the bedspread.
Canopy
Glue a bit of prepared fabric to the top of the canopy. I used the same fabric as for the canopy. Trim off the excess when dry.
Plain valance: Cut a strip of fabric, about 2.5 to 3 mm (3/32" to 1/8") wide and 5 cm (2") long. Secure both long edges with glue or paint. Or, use silk ribbon. Glue it around the canopy, top edge flush. Trim the ends short and glue them to the back.
 Pleated valance: The procedure is similar to the pleated dust valance. First, spread glue on one side edge of the canopy, and pat the pleated strip in place.
When the glue has dried, apply glue inside each pleat using a pin or other tool with a fine point, then squish them flat. Keep squishing until all stay flat. Wipe off any excess glue.
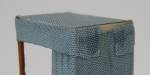
Cornice

You'll miter it using a scalpel. Be careful not to cut yourself! Place the cornice strip flat on the table and cut straight across the strip, but slant the blade at about 45° angle relative to the surface of the table. Just as if you were slicing a loaf of bread, and decided to cut slices that were a different thickness at the base compared to at the top.
Note that the cornice is glued to the upper part of the front and sides of the canopy, not to the top surface.
Cut the foot end piece first (one miter at each end, the inside should fit across the canopy). Touch up the ends with stain if needed. Glue it on, with the double thickness facing up. If you made a pleated canopy valance, the cornice has to sit on the part of the valance that is squished flat, so it'll probably extend a little bit beyond the top of the canopy.
Then cut the long sides, starting with the 45° angle. Try the end against the glued on bit, to see if it fits. When it does, cut it to length. Cut the other one in the same manner. Touch up with stain and glue on.
Further suggestions
- Some of Hepplewhite's designs have dust valance covering the lower part of the bedposts, like here. Others leave the bedposts visible all the way down to the floor. If you choose to let the bedposts show, cutting the notches and cutting lengths of dust valance to fit between the bedposts will require much more precision than if you follow the instructions given above.
- If you want to skip the dust valance, cut the bedspread fabric about 1 cm (3/8") longer and wider than the base, cut away squares as before, and trim off the excess at the bottom when you've glued it in place. Here, too, you'll have to be really precise, otherwise parts of the base will show through.
- Bored of mahogany? Hepplewhite's book suggests the wood can be japanned (i.e. lacquered black, probably with details picked out in gold) or gilt. You could use a metal finding for a carved headboard, and paint it to match.
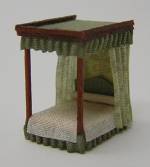
Colonial four-poster
 I've only seen this type of beds described as American Colonial, so I don't know if similar styles were used in Georgian England too (if you happen to know, please drop me a line so I can correct this information!).
The woodwork of this bed is supposed to be correct for beds from circa 1760 and on, but the lace canopy valance would probably be a later concoction.
These instructions are a part of the Georgian four-poster page, as they rely on the Georgian bed instructions, with a few little changes.
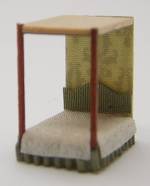
Cutting and assembly
You start out as for the Georgian bed but cut four bedposts, and notch the base and canopy at all four corners. Skip the PaperWood back entirely.
Cut the bedspread fabric 3 to 4 mm (1/8" to 3/16") longer and wider than the base and canopy. Place the canopy centered on the fabric and use it as a template for cutting away squares at all four the corners of the fabric, reaching from the notches to the edge.
Continue the assembly as above, but skip preparing the cornice. When you come to the headboard section, do it like this instead:
Headboard
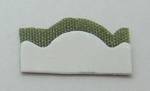
Cut Paperwood with decorative scissors, along the grain. The headboard will be centered around the highest point on the cut edge. Sand the edges if they're fuzzy.
Mark the lower edge of the headboard, about 3 to 4 mm (1/8" to 5/32") down from the highest point. Cut straight.

Measure the exact width between the posts at the head of the bed. Mark this measurement on the paperwood strip, centered around a high point.
If you'd like to, you can punch a 1.5 mm (1/16") hole centered over each of the two ends of the headboard. For me, the PaperWood stuck on the punch and I had to pry it loose. If the holes are fuzzy, neaten them with a round needle file.
Stain the strip and apply the clear finish when dry. Let dry completely.
Trim at the marks and glue the headboard in place on the bed, between the posts.
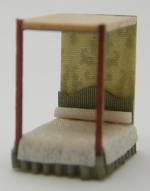
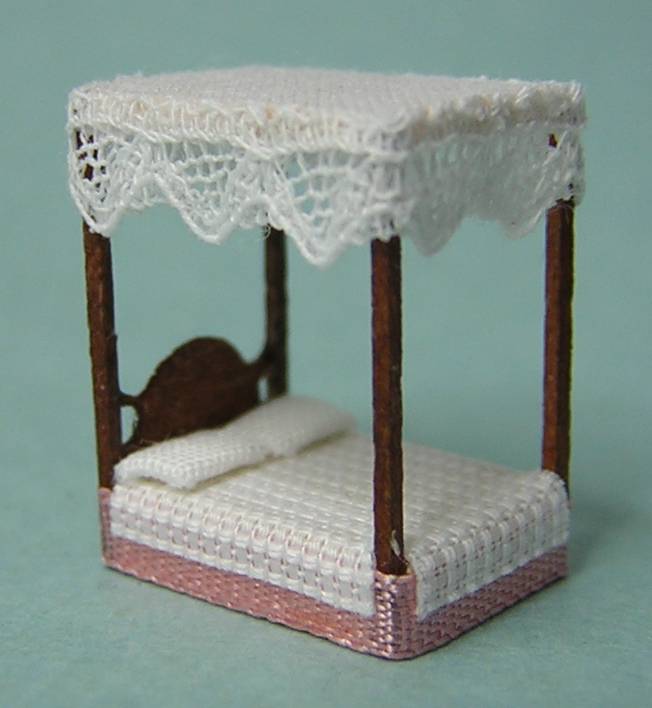
Pillows and canopy
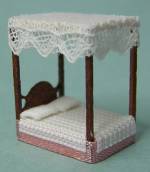
I skipped the bolster and made pillows from the instructions on the Modern bedroom page instead.
Follow the canopy instructions above, but omit the hangings if you like. For the canopy valance, I used the scalloped edge of a narrow cotton lace.