1:144 scale Georgian fireplaces
Idea and instructions by Anna-Carin Betzén
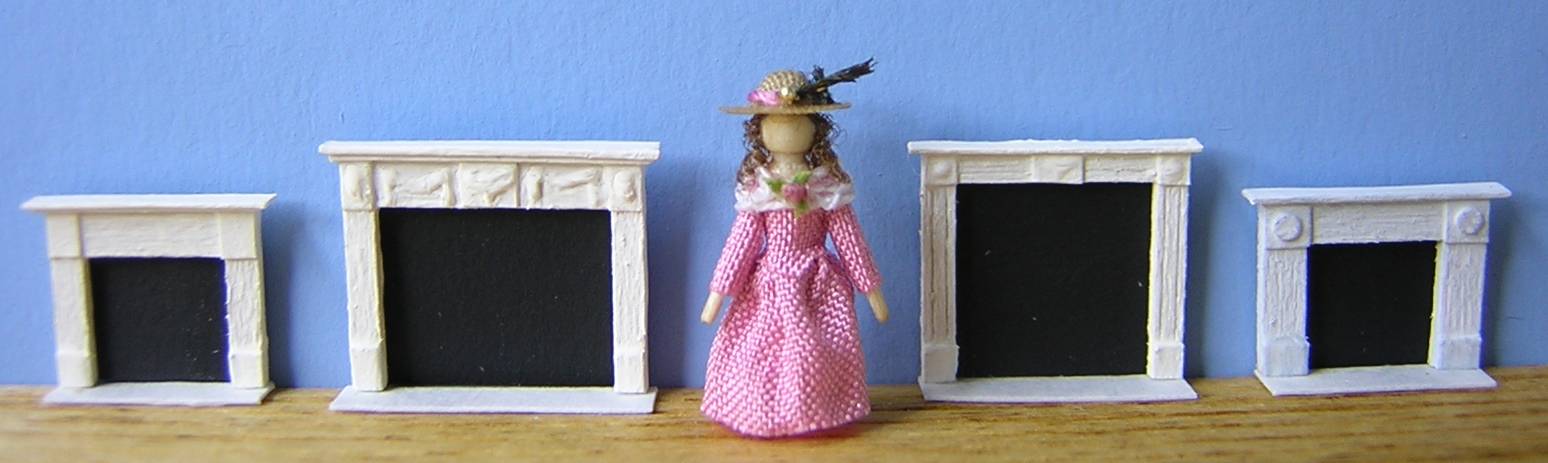
These fireplaces are late Georgian, or rather Neoclassical, in style - especially suitable for houses furnished from 1760 to 1820. Fireplaces of that era were often fairly straigthforward designs, made from rectangular pieces, perhaps with some low relief carvings. These are some characteristics of fireplace designs from the earlier and later parts of the period:
| To the left of the doll: 1760 to 1790 | To the right of the doll: 1790 to 1820 |
|---|---|
|
|
Supplies and tools
- Stripwood: 0.5 to 1 mm thick and 1 to 1.5 mm wide,
or 1/32" thick and 1/32" to 1/16" wide,
or H0 scale lumber, 2 to 3 scale inches thick and 4 to 6 scale inches wide
(I used H0 2×4 and H0 2×6) - Index card (or other thin card or heavy paper)
- A scalpel or chopper for cutting wood
- Sharp scissors (for cutting card/paper)
- Toothpick or other pointed tool for applying glue
- Tacky glue or similar
- Paint (e.g. broken white or grey)
- For the back and hearth: black paint. Optional: marbled card
The base
First of all, pick the size(s) of stripwood you want to use, from the ones suggested in the supplies list:
- 1760 to 1790 - Two different sizes: same thickness, different widths.
- 1790 to 1820 - One size only, any of the sizes suggested.
If you want the pilasters and frieze to be reeded, use a pin and ruler to indent two or three parallell lines on the stripwood (easiest done before cutting!).
Cut two pilasters from stripwood (if you use two different widths, it should be from the narrow one). They should be 7 to 9 mm (9/32" to 11/32") long; the finished fireplace will be a tiny bit taller.
The frieze is next. If you use two different widths, now you need the wide one. For a fireplace with a square opening, cut the frieze the length of the pilasters, less the width of the frieze. Otherwise, cut it the same length as the pilasters.
Placing all pieces flat on the table, glue the frieze between the pilasters. Let it dry for a while so it doesn't come apart when you continue. By the way, the drawings are not to scale!
Cut a strip of index card, about 3 to 5 mm (1/8" to 3/16") wide. The width isn't crucial, you'll trim off the excess later.
Cut two bits from the index card strip, try to keep the corners square. Glue them to the two top corners. They should sit straight, with one corner touching the fireplace opening.
Cut another bit of the index card strip, about 2 cm (3/4") long. Spread glue on the lower part of the pilasters and stick the strip to them.
Turn the fireplace face down so you can see if the strip sits straight, adjust it as needed.
Let the glue set for at least a few minutes (preferably a quarter of an hour), then trim off the excess card with scissors.
This is what the front of the fireplace will look like when the card has been trimmed. From now on, only the outline of the card pieces will show, like in the pic to the right.
If you want a raised plaque in the center of the frieze, glue on a bit of index card flush with the lower edge of the frieze. Trim when dry.
Shelf
Spread glue on the top of the fireplace and stick it to a piece of index card, with the front facing the edge. The card should extend a little bit beyond the front of the fireplace (maybe 0.5 mm or 1/64"). (I hope you see what I mean, this step was hard to illustrate.)
Let the glue dry for at quarter of an hour, so the card won't slide when you trim it.
Cut with scissors, flush with the back of the fireplace. Trim the ends too, leaving about as much card as on the front.
For the 1760 to 1790 designs with slim pilasters and wide frieze, repeat the process to add a second layer that is a little larger than the first. Trim as before.
Carvings
The carvings are entirely optional, and many fireplaces of the time didn't have any (e.g. in smaller houses or less prestigious rooms).
For a basic but accurate 1790 to 1820 design, simply add a circle to each of the two top corner blocks. A sequin hole is about the right size, but you can also use a blob of glue, or a really tiny punched circle.
This 1760 to 1790 design is well suited for a beautiful room. You need a toothpick, pin, or other suitable pointed tool, and some Tacky glue or other thick glue. Just follow these steps:
Put an oval glue blob on each of the two corner blocks.
Try to draw a simple urn with glue on center plaque.
On each of the other two fields, draw two lines with glue...
...and join them with a curved line for a swag.
For a similar 1790 to 1820 design, skip the swags (decorate only the corner blocks and the plaque). Here it's shown with reeded pilasters and frieze.
This design doesn't have raised corner blocks like the other designs, instead the entire upper part is raised, and the frieze a bit extra. So, the gluing-on-bits-of-card will be a little different for this one:
The pics to the right show how card is added in two steps. First to the upper part and column bases, then to the actual frieze only. Add the shelf as before. Apply the "carving" by making all the straight glue lines first (as described earlier), then adding the swags.
Paint
White marble fireplaces were very popular from about 1750 and on, but grey and black marble and colored scagliola (imitated marble) were also used. Wooden fireplaces were always painted, often with broken white paint. I used FolkArt #649 (warm white).
Many of the 1790 to 1820 fireplaces I've seen are made of grey stone, while others are white like the earlier ones.
Hearth
I've used marbled card from a gift card, but you can also cut the hearth from index card and paint it to your liking. It should be a tiny bit wider than the base of the fireplace, and about 1.5 mm (1/16") deeper. Glue the fireplace onto the hearth, back edges flush.
Back
The easiest option is to paint a bit of paper black, cut a piece that is a little smaller than the outside measurements of the fireplace, and glue it to the back. Or you could find a pic of a fireplace with a grate and print it at a suitable size.
A chimney breast adds realism, as you can cut out an opening and paint black, and glue the fireplace in front. Then you've got enough space to put a "fire" in it too.
Suggestions for accessories
If you'd like to add some accessories to bring your fireplace to life (if that's possible!), here are a few suggestions. I'm leaving it to you to figure out how to actually make them! The photos below are from my Georgian townhouse.
Fireplace accessories
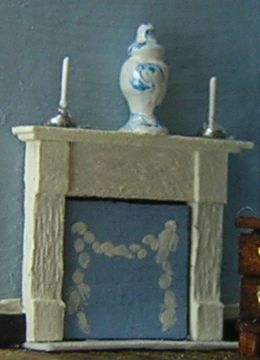 During Summer when the fireplace was not in use, a chimneyboard was often put into the opening to stop the draft. This could be painted showing a vase of flowers (you could use a printie), or just finished to match the room's decor. Another alternative was to put a large vase or urn of flowers in the opening.
Firedogs hold the wood in place. Searching the web for firedog pics, and rummaging through your findings, may give you some ideas.
Various grates for burning coal were introduced from 1750 and on. Hot coals could fall down from the grate and roll onto the floor, so people started using fenders (low metal frames set on the hearth) around 1760 to prevent runaway coals from damaging the floor or carpet. Some continued burning wood, and for them there was no need for a fender.
 For a fender you can fasten a bit of ribbon or lace around a plastic-wrapped bit of wood, stiffen it with FrayCheck, Stiffy or perhaps diluted glue, remove it when dry and cut to size (about 1 mm or 3/64" wide). Paint it brass.
Chimney ornaments
Don't forget to put some ornaments on the mantelshelf. Typically there'd be matching pairs plus a single one in the center. Chinese porcelain was very popular from the 1600s up to the the 1760s, when the Neoclassical style became popular. The Neoclassical ornaments included figures, obelisks, candelabra, and Wedgwood's Black Basaltes.