1:144 scale Georgian chests
Idea and instructions by Anna-Carin Betzén
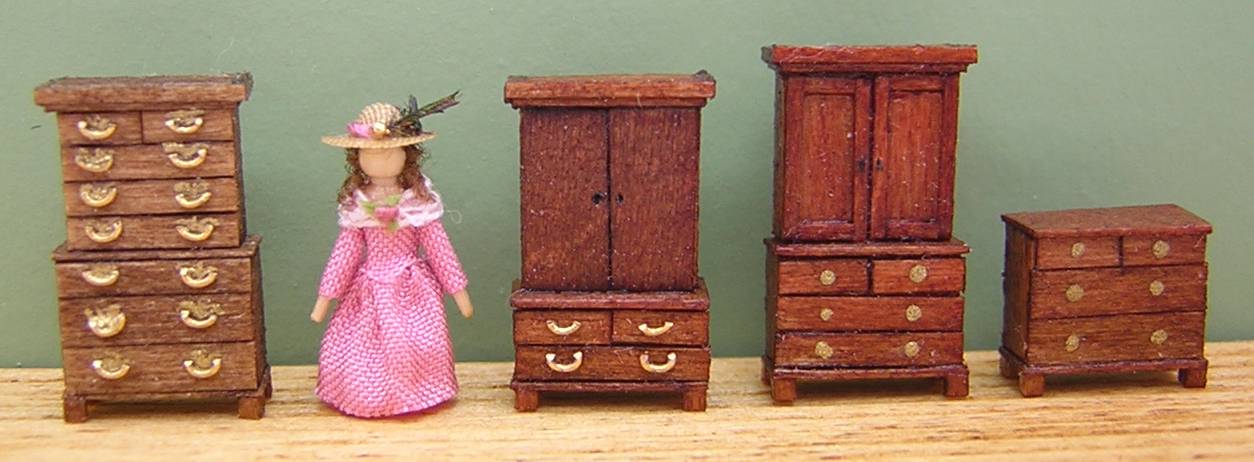
Build a miniature chest-on-chest so your 1:144 scale people can store their clothes or bed linen in style. Besides the chest-on-chest (aka double chest or tallboy), there are hints for adapting the instructions to make a chest of drawers and a clothes press (aka linen press or wardrobe) too.
Feel free to adapt the designs by changing or adding trim, or altering the proportions of the furniture as you like. There's lots of inspiration to be found in online antiques stores!
Supplies and tools
- Stripwood: 3×8 mm (1/8"×5/16") for the lower chest,
2×7 mm (3/32"×9/32") for the upper chest - H0 scale lumber: 1×2, 1×3, 1×4, 1×6, and 3×3 (or 1/32" square)
- PaperWood or other thin wood (about 0.5 mm or 1/64" thick)
- A scalpel for cutting
- Stain
- Danish oil or other clear finish
- Tacky glue
- For handles: fine chain (brass or gold finish), a wire cutter, pointed tweezers and cyanoacrylate glue
or: brass or gold paint (I used brass color Model Master paint by Testor), a sewing pin and a heavy-duty wire cutter
Chest-on-chest
A chest-on-chest of this design could've been made anytime between 1720 and 1820, at the very least. Depending on what stain color and drawer handles you choose, you'll narrow it down to a part of that period.
In the early 1700s, fine furniture in England was usually built from walnut, but the hard winter of 1709 killed many walnut trees in Central Europe, and France banned walnut exports in 1720 due to scarcity. The following year, England abolished import duties on mahogany and other timbers from its colonies, and mahogany started gaining ground, eventually becaming the preferred wood. From 1790 to 1830, satinwood was also popular.
Check out the Hints and guides section of the site for additional information about the wood types I use, as well as hints on cutting and finishing.
Constructing the base
The supplies list states which dimension of wood to use for the upper and lower chest respectively. Cut the lower chest 5.5 mm (7/32") long. Cut the upper chest 6.5 mm (1/4") long. (The grain will run vertically so the length of the pieces will be their finished height; the end grain is the top/bottom.)
From PaperWood, cut two pieces that are 0.5 to 0.75 mm (1/64" to 1/32") wider and longer than the top and bottom of the lower chest, and one piece to fit the top of the upper chest exactly.
Stain all parts. While you're at it, stain some bits of scale lumber too - about 1 cm (1/2") of the square strip and 5 cm (2") each of the others, this will give you some extra for errors.
Glue the smallest piece of PaperWood to the end grain of the upper chest piece, it will cover it precisely. This will be the top.
Glue the larger pieces of PaperWood to the top and bottom (i.e. end grain sides) of the lower chest piece: back edges flush, and center them left/right.
Finally, glue the upper chest to the lower chest, back edges flush. Remember, the end covered with PaperWood is the top end of the upper chest.
Faux molding
The "faux" part about the molding is that you don't really use molding - you build it up from layers of stripwood. It's not mitered either, you just glue on bits on the various sides so one piece butts against the next. I use a no-measure method - don't cut the pieces to fit, just spread glue on a bit of the stripwood, fit it in place, and trim off the excess when the glue has set a bit (put the piece front down on your cutting surface, and trim with a scalpel).
First of all you have to glue a bit of H0 1×3 to the top front. This compensate for the thickness of the drawer fronts that will be added later (otherwise the molding wouldn't extend properly at the front).
Remember - glue first, then cut, so no need to measure.
Apply H0 1×3 to the top of the sides, in the same manner...
... and then to the front.
If the cut edges reveal unstained wood, dip a Q-tip (cotton bud) lightly in stain (it should be moist rather than wet) and touch up. You can probably use it repeatedly during the same work session, without dipping it again.
Using H0 1×2, again apply strips to the very top of the sides, layering it on the previous strip.
Apply H0 1×2 to the front too, and the molding is done!
Drawers
The drawers for the lower chest are cut from H0 1×4 and/or H0 1×6, each the same length as the width of the lower chest (8 mm or 5/16"). For me, two bits of H0 1×6 and one bit of H0 1×4 gave a nice fit, but you may need to experiment to see what works best for you, depending on the exact size of your chest (your chest-on-chest, that is!).
When your drawers fit nicely, glue them in place. (Erhm... I mean your chest-on-chest's drawers.) Put any shallow drawers upmost and the deeper ones below. You can adjust them with the tip of a pin to make the gaps even.
Next, try the fit of the upper chest's drawers. These are cut from H0 1×4 and perhaps H0 1×3, and are the same length as the width of the upper chest (7 mm or 9/32"). When the fit is right, cut the upmost drawer in two before gluing them in place. Again, shallowest drawers are placed upmost.
Legs and finish
Find the strip of square lumber you stained a while ago. Cut four bits of it (plus spares if you'd like), 0.75 mm (1/32") long. Glue one under each corner of the chest-on-chest, flush with the edges of the PaperWood. (If you want to refine the design, study photos of full-scale chest-on-chests, and carve the inside of the legs before staining, cutting and gluing!)
You've now assembled a piece of 1:144 scale furniture from 24 parts of wood. Impressive, huh?
Apply your chosen clear finish - I used two thin coats of Danish oil. Let it dry completely.
Drawer handles
From what I've seen, Georgian drawer handles were always 'hinged', i.e. you lift them to pull, and when you let go they swing back down. So the easiest way to portray them is to glue the handle shape flat against the front of the drawer.
These are the main types of drawer handles used during the Georgian era:
|
|
|
|
|
1660 to 1775 C-shaped handles with fancy back plates. Glue on the handles, then paint the area inside the handles. If you're good at painting tiny details, add curlicues around the top and side edges too. |
1730 to 1820 C-shaped handles without back plates. Glue on the handles, and you're done. |
1790 to 1820 Round or oval back plates, outlined by unobtrusive handles. Paint dots or ovals with a cut off pin dipped in paint. Or, you can glue on an oval or C-shaped handle, then paint the oval inside. |
Painted back plates
For round or oval back plates, take a sewing pin and cut off the pointed part using a heavy duty wire cutter. Dip in paint, and make a couple of practice dots on a scrap. Wiping the pin after each dot may help keep the dots a uniform size. When you're happy with the results, put dots on the drawers as shown in the pic.
A cut-off pin is too thick for painting curlicues, try a blunt needle or stylus type tool for that.
Glued on handles
You need a metal chain with fairly small links, about 1 mm (1/32" to 3/64") long. Cut some links in half, using fine wire cutters. Put a drop of cyanoacrylate glue on a bread tag or other non-absorbing surface. Grip a 'handle' with the tweezers, dip it into the glue, touch down lightly on a clean area of the surface to blot off excess glue, and position it on one of the drawers. Wipe the tweezers before going on to the next handle, so the glue doesn't build up (it's much easier to do before it's dried!).
Chest of drawers
The chest of drawers fits the same general time period as the chest-on-chest. Follow the chest-on-chest instructions, but with two changes:
- omit the upper chest
- cut the upmost drawer in two
Clothes press

A clothes press could also be called a linen press, or wardrobe. Behind the doors, it had sliding shelves that the clothes were laid on. I've seen clothes presses similar to the ones shown here, from the period 1760-1810.
You choose if you want panelled doors or plain doors, and how tall you want the chest part to be (this also affects the number of drawers).
Compared to the chest-on-chest, the clothes press has:
- lower 'hips'
- doors rather than drawers on the upper part
- the upmost drawer cut in two
Also, note that there are no handles on the doors; only key holes.
The base
Cut the lower part from 3×8 mm (1/8"×5/16") wood, 3.5 to 4.5 mm (1/8" to 3/16") tall, and the upper part from 2×7 mm (3/32"×9/32") wood, 8 to 9 mm (5/16" to 3/8") tall. (Match a tall lower part with a low upper part, or vice versa, to keep the overall height the same.)
Cut PaperWood parts, stain everything and assemble as for the chest-on-chest. Add the top molding too.
Drawers and doors
Trial fit drawers on the lower part. If you chose to make it really low, there'll only be room for two drawers above each other. When you're happy with the fit, cut the upmost drawer in two. Glue on.
Next, decide what type of doors you want - plain or panelled:
![]()
Plain doors: For really easy-to-make doors, measure the upper part and cut a piece of PaperWood to that width and height, with the grain running vertical. Cut it in half, stain and glue on.
Panelled doors: Skip the PaperWood step described above.
Draw a pencil line down the center of the door area.
Measure the height of the upper part and cut four bits of H0 1×2 to that length. Glue one on either side of the pencil line, and one along each outer edge.
Cut four more bits of H0 1×2, to fit across the gaps at top and bottom. Glue on.
Legs and finish
Apply legs and a finish as for the chest-on-chest.
Handles and keyholes
Add handles to the drawers, as for the chest-on-chest.
The key holes should be placed halfway up the doors, as shown. Indent with the tip of a sewing pin, then dip the very point of the pin in black paint and go back in the same indent, to make it show better. Make one key hole on each door.