
1:144 scale Christmas tree
Idea and instructions by Anna-Carin Betzén
You probably already know how to make a Christmas tree by trimming down a chenille stem. I only had bright green chenille stems, so I tried painting my tree. Not only did it work - I also found that it made the fibers stick together in branch-like lumps, creating a more natural look.
Besides, the space between the "branches" allowed me to "hang" baubles from the branches, rather than sticking them on the "outside" of the tree. That, too, is along the lines of how I think a Christmas tree should look. You see, most Christmas trees in Sweden are Norway Spruce (Picea abies), which aren't nearly as dense as the fir and pine trees popular in the US.
Supplies and tools
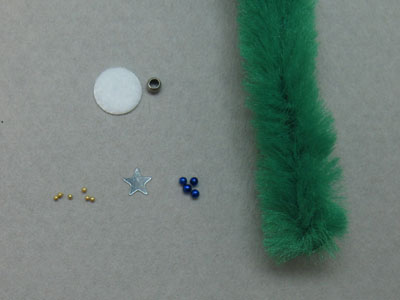
- Chenille stem, 12 mm (1/2") thick
- Velour paper or heavy paper for tree mat
- Crimp bead or other small cylindrical bead with a fairly big hole for tree stand
- Paint for the tree (I used FolkArt #726 Green Meadow)
- Scissors
- Reverse action tweezers
- Wire cutter
- Firm, flat, paintbrush (mine is about 5 mm or 3/16" wide)
- Toothpick or similar for applying glue
- 6 mm (1/4") circle craft punch (optional)
- Uncooked spaghetti straw (optional, for placing beads on the tree)
- Tacky Glue
- Aleene's Stiffy fabric stiffener (optional)
- Ultra-fine glitter (available from Kitz! - check out my Supply sources page in the Resources section)
- 1 mm (1/32") and/or 0.5 mm (1/64") no hole beads
- Tiny star sequin for topper
Making the tree
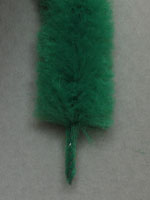
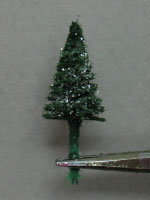
At one end of the chenille stem, trim the fibres as close to the twisted wire center as you can, for about 10 mm (3/8").
The trimmed stem will serve as a handle to begin with, and later it will be cut shorter to fit in the tree stand (a.k.a. the bead). Check that it fits in the bead.

Measure the desired height of your tree and cut with wire cutters.
For a 2.1 m (7 ft) tree, the furry section should be about 12 mm (1/2") - the stand and tree mat will add to the height.
Trim the chenille with scissors. I find it easiest to do by turning the stem little by little. When you think you're done, rotate it to check that it's fairly symmetrical.

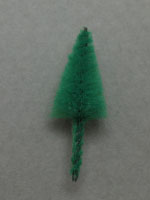
Paint the tree. I use an up/down stroke and a generous amount of paint. The fibers will stick together changing the look of the tree. Adjust with the paintbrush until you think it looks good, them stick the "handle" in your reverse-action tweezers and set it aside to dry.
When the paint has dried, trim off the odd fibers sticking out here and there.
If you're painting your tree a completely different color (say, painting a green chenille stem pink), it'll probably need an additional coat of paint.
Decorating the tree
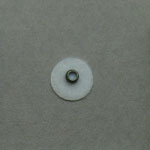
Check that the tree's stem fits in the bead, if not trim it further or find a bigger bead. Paint the bead if you like.
Cut or punch a 6 mm (1/4") circle for the tree mat. Glue the bead to the center of the tree mat. I push it down hard to make sure it sticks to the paper backing, not just to the velour.
Leave it to dry while you decorate the tree.
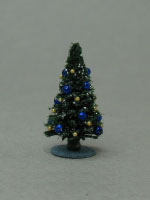
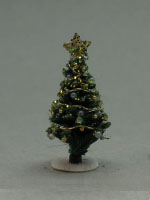
I add glitter by brushing some Stiffy on the tip of the branches, and sprinkling with ultra-fine glitter.
The Stiffy is like diluted glue, but ready to use straight from the bottle. Or use Tacky Glue if you prefer, either as is or diluted. Stiffy or diluted glue gives you more working time than regular Tacky Glue, as it takes longer to dry.

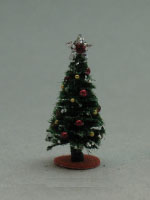
To apply the no hole beads, lick the end of a piece of uncooked pasta, pick up a bead and place it on a tiny glue dot between the branches.
Don't be tempted to add a tree topper at this point! You've got to add the stand first.
Check that the tree stand is firmly glued to the tree mat.
Trim the stem to about 1.5 mm (1/16"), put some glue in the tree stand and insert the stem. Push down at the very top of the tree to make sure it's properly inserted in the stand (the tree isn't as fragile as one might think). Turn the tree around to check that it sits straight, and adjust if needed.
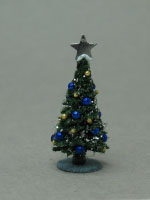
Glue the star to the treetop and leave it to dry.
If you'd prefer an angel tree topper, check out the free how-to provided by Frances Armstrong.
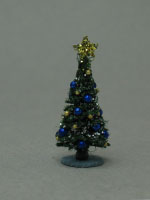
Spread glue on the star and apply ultra-fine glitter to tone it down.
All that remains is to admire your finished tree and place it in a mini setting!
More ideas
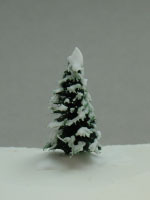
For an outdoor tree, you can glue the stem into a drilled or poked hole in your landscaping base. The snow is Aleene's True Snow. I recently discovered this product and think it's great.
Here, I played with different colors of glitter, making a two-tone star topper.
An early experiment. The metallic embroidery thread garland on this tree was a real pain to glue on. It didn't want to stick nor stay where I wanted it.
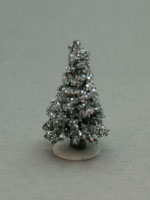
A 1960s aluminum tree (or aluminium to us Europeans, though I don't know if the trees ever made it here).
I used two coats of medium gray paint, then applied Stiffy to the top of the branches and sprinkled with ultra-fine glitter
(for my first attempt I applied glue and glitter all over, but that turned the tree into a blurry glittery cone without branches). You might want to spray it with a sealer afterwards.
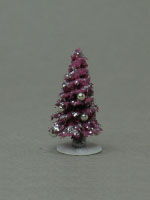
Two coats of pink paint, glitter at the tips of the branches, and silver no hole beads.