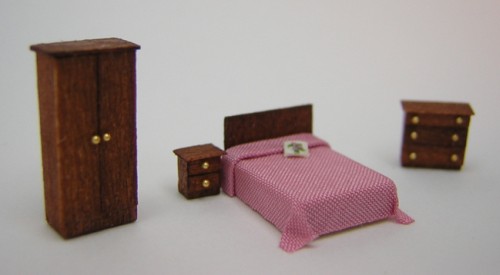
1:144 scale bedroom furniture
Idea and instructions by Anna-Carin Betzén
This bedroom set is the first 1:144 scale furniture I designed and wrote how-tos for.
I used furniture of this design in the bedroom of my Florida Art Deco house.
Supplies and tools
- PaperWood or other thin wood (about 0.5 mm or 1/64" thick)
- Stripwood:
- Bed: 3 mm (1/8") thick and 6 to12 mm (1/4" to 1/2") wide
- Wardrobe: 4×7 mm (5/32"×1/4")
- Chest of drawers: 2.5×6 mm (3/32"×1/4")
- Bedside table: 2.5×3 mm (3/32"×1/8")
- Tiny no-hole beads
- Scale lumber: H0 1×4, H0 1×6, H0 1×10
- Chopper or scalpel for cutting
- Sandpaper
- A heavy pin
- Tacky glue
- Stain and/or paint
- Cyanoacrylate glue for gluing on the knobs (or use Tacky Glue)
- Blouse weight silk fabric, or other thin fabric
- Sharp scissors
Check out the Hints and guides section of the site for additional information about the wood types I use, hints on cutting and and finishing, and preparing fabric for small-scale use.
Wardrobe
From 4×7 mm (5/32"×1/4") stripwood, cut a 14 mm (9/16") piece.
For the top, cut a 5×8 mm (3/16"×9/32") piece of PaperWood.
Cut two doors from H0 1×10, 12.5 mm (1/2") long.
Stain all pieces.
Glue the top to the wardrobe, centered left/right and back edges flush.
Glue on the doors; edge to edge and butting against the wardrobe top.
Optional: apply a clear finish like Danish Oil.
![]() Mark the position of the doorknobs by making a small dent in the doors, halfway up, using the tip of a pin. Apply a small amount of glue and put a no-hole bead in each dent. (Thanks to Frances Armstrong for this hint.)
Mark the position of the doorknobs by making a small dent in the doors, halfway up, using the tip of a pin. Apply a small amount of glue and put a no-hole bead in each dent. (Thanks to Frances Armstrong for this hint.)
Chest of drawers
From 2.5×6 mm (3/32"×1/4") stripwood, cut a 7 mm (1/4") piece.
Cut the top from H0 1×10, 7 mm (9/32") long.
Cut one drawer from H0 1×4 and two from H0 1×6, all 6 mm (1/4") long.
Stain all pieces.

Glue the top to the end grain side of the biggest piece, centered left/right and back edges flush.

Glue on the drawers, with the narrowest one at the top. They should sit close together, leaving some space near the floor.
Optional: apply a clear finish like Danish Oil.

Using the tip of a pin, make two dents on each drawer, about 1 mm (1/32") from each end. Apply a small amount of glue and put a no-hole bead in each dent.
Bedside table
From 2.5×3 mm (3/32"×1/8") stripwood, cut a 4 mm (5/32") piece.
Cut the top from H0 1×10, 4 mm (5/32") long.
Cut two drawers from H0 1×4, 3 mm (1/8") long.
Stain all pieces.

Glue the top to the end grain of the biggest piece, centered left/right and back edges flush.

Glue on the drawers, close together, leaving some space near the floor.
Optional: apply a clear finish like Danish Oil.

Dent the center of each drawer using the tip of a pin. Apply a small amount of glue and put a no-hole bead in each dent.
Bed
Chose your bed width - 6 mm (1/4") for a single bed, 10 mm (3/8") for a double bed, and 12 mm (1/2") for king size.
Cut the bed base from 3 mm (1/8") thick wood of your chosen width. I suggest you cut it 12 mm (1/2") long. (A true-to-scale length would be 14 mm or 9/16", but miniature houses often have small rooms so a little shorter may be safer.)
Using sandpaper, round the top edges of the base slightly.
Headboard
Either cut the headboard from PaperWood, the same width as the bed and e.g. 6 mm (1/4") tall, or use a suitably sized metal finding. If you want a headboard that is padded, and/or has a shaped top edge, check out the hints in the Headboard section on my page about making a Georgian four-poster.
If you want to stain and/or paint the headboard, clamp its lower edge in reverse tweezers and apply the finishes you like.
Glue the headboard to the bed.
Preparing the bedspread fabric
Put a small piece of fabric on a flat surface and carefully spread a bit of glue on the back. Don't apply any pressure; that would make it bleed through to the front. If you make a few attempts and still can't get it to work, try another fabric. (If you want more in-depth instructions with illustrations, go to my fabric hints page!)
When you've succeeded in coating the back with glue without it bleeding through, leave it to dry for at least half an hour. The glue skin on the back will keep glue from bleeding through when you glue the fabric to the furniture, and it will also prevent fraying.
Dressing the bed
Cut a piece of fabric at least 3 cm (1 1/4") square. These directions make a bedspread with a pillow fold, as shown in the pics. If you'd like to put a dust valance on your bed, see the Dust valance section on my Georgian four-poster page.
Along one edge of the fabric, fold 2 mm (3/32") towards the back and secure with glue.
If you want a thicker "pillow" than in the photo, glue a 2 mm strip of card in between the layers. It should be a little shorter than the width of your bed. Layer two or more bits of card for an even thicker pillow. You may want to round the edges or make the top layer narrower. (Thanks to Fran Sussman for this suggestion.)
Fold over again and glue.
Fold again, but this time towards the front. Pinch the fold but don't glue.
Spread glue on top of the bed base and press the bedspread in place. If you put a piece of card inside your pillow fold, make sure it's centered on the bed!
Apply a tiny bit of glue under the pillow fold to hold it down, on the top of the bed only.
Spread glue on the left and right sides of the bed base and press the bedspread in place. Glue the pillow fold in place, where it hangs down the sides. When the glue has grabbed, trim the fabric along the lower edge of the base. Repeat on the foot end.
The bedspread now sticks out at the corners of the bed. Round the bedspread corners if you like. Spread some glue on the inside of the fabric and push down on the middle, against the very corner, to make it drape.
Pillows
Treat a bit of contrasting fabric with glue.
Cut some 2 mm (3/32") squares from index card (or similar thin card).
Secure one of the card squares to the back of the fabric with a tiny dab of glue. The card square's edges should run on the bias of the fabric, not along the grain (this helps making the corners neat).
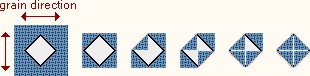
Proceed as shown in the sketches -
- Trim the fabric along the grain, close to the tips of the square.
- Glue the four flaps to the square, one by one.
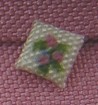
When done, turn the pillow over! Bend it into an attractive shape and glue in place. I painted a flower motif on the pillow using waterbased paint (FolkArt brand) and a pointed toothpick.
If you want a pillow with real padding, try gluing the card square to a tiny bit of cotton wool and trim off the excess, then glue it to the fabric (cotton wool side down) and proceed as above.